Tuesday, December 20, 2016

GCRmanager, Part 2

If you run G Suite for Education (formerly Google Apps for Education), you probably use Google Classroom. If you read my article on the GCRmanager add-on for Google Sheets, then you know that you can pull data from G Suite about your school's usage of Google Classroom. Getting insight from that data can sometimes be challenging. So I decided I needed to write a follow-up to that article.

First, read my previous article. Once you have the data in Sheets and it finished filling in all the data, do this:

  1. Click on "Data" in the menu bar and then on "Pivot Table..."
  2. You'll be dropped into a new environment. On the bottom of the screen are tabs that you can use to flip between the full data you saw a moment ago and this new pivot table environment. For now, stay on the pivot table.
  3. On the right side, click on "Add field" next to "Rows" and select "OwnerEmail".
  4. On the right side, click on "Add field" next to "Columns" and select "courseState".
  5. On the right side, click on "Add field" next to "Values" and select "id". Set "Summarize by:" to "COUNTA".

At this point, you should have a list of teachers' email addresses. Next to each address, are three fields. The first is how many Classroom instances they created and haven't archived. This should be the number that they're actually using, but it is possible that they abandoned Classroom all together (and didn't clean up first) or that they're leaving old things active for their own reasons. The second field is the number that they've archived. The difference between these numbers is useful for seeing how they've shaped up over time. The third field is just the total of the first two.

If you want to "zoom in" on a school, there is a way to do that. On the right side, click on "Add field" next to "Filter" and select "OwnerEmail". Then click next to "Show:" to bring up a menu. Inside that menu, click on "Clear" to make the table show no one at all. Then click next to each name to put a check mark there and add them back to the table. This will allow you to see just the school, department, or team that you want to know about.

That is basically it. Pivot tables are a great tool once you learn how they work. They only work with certain kinds of data -- what is called "transactional data." Fortunately, that is exactly what GCRmanager makes. So feel free to tinker with the settings in order to see what you can do with it. There is probably a lot of interesting stuff you can figure out.

Tuesday, December 13, 2016

NTP Server Testing

If you run an NTP server, you should try this site. It is good for checking if your NTP server is available to your users when they're not on your internal network. It can also be helpful for running some security testing.

Tuesday, December 6, 2016

SSHguard & IPFW

It seems that SSHguard 1.7 dropped support for the "hosts.allow" file. Since I already wrote about how to setup SSHguard 1.6.x on FreeBSD using TCP Wrappers, I thought I should offer a quick update for SSHguard 1.7.x.

Please note that the process shown here assumes FreeBSD 10.x and SSHguard 1.7.x. The directions will go through five major steps: (1) Install SSHguard, (2) get SSHguard configured, (3) get IPFW started, (4) restart to bring it all together and make sure it works. Lastly, I'll cover (5) how to look at what is happening.

First, install SSHguard from the ports collection or upgrade it with portmaster, as needed. For example, to install it for the first time, you could:

su
cd /usr/ports/security/sshguard
make install

When prompted, select IPFW. To clean up unnecessary files, you can type "make clean", but this step is optional. If you already have it installed, check the FreeBSD Handbook for directions on using portsnap (section 4.5) and portmaster (section 4.5.3.1) to upgrade the port. Just be careful to avoid breaking any other ports in the process.

Once you have SSHguard 1.7.x installed, you'll need to configure it. Start by whitelisting any necessary IP addresses by adding them to the file "/usr/local/etc/sshguard.whitelist". Only add one IP address per line. I recommend preceding those lines with a comment to help you remember why you added them. Comments are lines that begin with a ”#”. So you might have something like this:

# Don't block the VPN server.
12.34.56.78

The last step in configuring SSHguard is to tell your system to run it at boot time. Do this by adding these lines to "/etc/rc.conf":

# Start SSHGuard
sshguard_enable="YES"

Now we should be ready to move on to the IPFW system. This replaces the much easier to manage TCP Wrappers system we used in SSHguard 1.6, a.k.a. the "/etc/hosts.allow" file. The first step is to enable the IPFW firewall at boot time by adding these lines to /etc/rc.conf:

firewall_enable="YES"
firewall_logging="YES"
firewall_type="open"

If you don't want to reboot the system, you can manually start the firewall by running "service ipfw start" as root. This is a great way to make sure that all your settings are right so far. However, don't do this unless you have physical access to the server. Changing firewall settings when you only have a network connection to the system is a quick way to get locked out of it by accident. The steps I've listed here won't do that, but I don't know what other changes you've made before reading this article, so I'm including this warning just in case.

Now that we have IPFW running, SSHguard will report suspicious activity to what IPFW calls "table 22." We need to tell IPFW to block everything listed in table 22. To do this, edit /etc/rc.local and add the following lines. If the file already exists, skip the first line and add the rest to the end of the file.

#!/bin/sh
echo Adding sshguard to IPFW settings
/sbin/ipfw -q add 55000 deny all from 'table(22)' to any

Next, allow the /etc/rc.local script to run during system startup. To do that, run this command as root:

chmod 0755 /etc/rc.local

Restart the system with "shutdown -r now" to confirm that this script runs properly at startup. Watch for it when the startup messages scroll by on console and also check the settings by logging in as root and typing "ipfw list".

That is basically it. I encourage you to review these steps and try to learn what they do and why they work that way. You'll probably find ways to adjust this process to fit your system a little better. However, this should get you started.

If you ever want to know what the IPFW firewall is doing, you can check its rules by running "ipfw list" as root.

If you want to see the SSHguard rules, specifically, you need to look at table 22. SSHguard keeps these rules isolated in their own table, so they don't accidentally overwrite anything else nor create any other unpredictable outcomes. To look at table 22, just run "ipfw table 22 list" as root.

Lastly, if you're setting up SSHguard for the first time, please read the end of my older article as well. It includes some advice that is still relevant. Also, remember that SSHguard should only a piece of your risk mitigation strategy. No single product or trick will ever cover you completely. Even if you're not an expert in Information Security, you should always strive for defense in depth as a way to reduce your risks.

Tuesday, November 29, 2016

Google Drive and a Second Chromebook

When you buy a Chromebook, it usually comes with a two year upgrade of an extra 100GB on your Google account. What I didn't know, was if you could use the promotion again after the two years ended.

For example, I signed up for a free preview of YouTube Red a while back. When the preview was over, I happened to have a Chromecast and there was a promotion for a free month of YouTube Red for Chromecast owners. Unfortunately, I couldn't sign up for that, because I was no longer considered a "new" subscriber.

In 2014, I received a chromebook that had a bonus 1TB upgrade for Google Drive for two years. I gave it a try and the two years ran out very recently. Before it ran out, I bought a new chromebook. I'll skip the story of why I did this. What matters is this: It also had a bonus 100GB on Google Drive for two years. So when my two years of the 1TB upgrade ran out, I went to the Chromebook Goodies website from the new chromebook to see if I could redeem the offer. At worst, it would only be for new users, like the YouTube Red promotion mentioned above.

Fortunately, I was able to redeem the offer. It seems that Google doesn't care if you're a new user or an existing one -- only that you bought a chromebook.

So if you're the kind of person who would pay $2 each month for the 100GB of extra storage, then this is like an extra $48 off the cost of the chromebook every two years. I've seen decent chromebooks for as little as $200, so this can be a significant fraction of the cost. Even some of the nicer chromebooks are in the $300-$400 range, which would make this a 12% - 16% discount.

Side note #1: Keep an eye open for a "security checkup" deal with Google in February. In February 2015 and 2016, they offered an extra 2GB of storage for anyone who did this. I did it both times and I now have 19GB of free space in my account, in addition to the 100GB promotion from my chromebook. (Yes, a total of 119GB of storage for things I was going to do anyway.) The security checkup was a series of questions that you should probably check on anyway, so I highly recommend doing this if they offer it again in February of 2017.

Side note #2: If you have an old G Suite account from when they were free (back when it was just called "Google Apps" and they gave you 100 free accounts), this promotion will work. I'm using it with my account, which I registered in 2008.

Tuesday, March 8, 2016

Graph Your Network Traffic

You need to graph your Internet usage, if not all network usage. I'm surprised I didn't write about this sooner. I talk about it frequently. It is one of the steps that separates a professional network or system administrator from someone just trying to keep things running. So let's dig into this.

Which discussion would you rather have when it's time to plan the budget:

A: "Things seem slow sometimes; especially during business hours. I believe that we should pay for a bigger Internet connection in order to address this."

...or...

B: "Here is a graph of our Internet usage over the last week. The dotted line across the top is what purchase from our ISP. The green line is our actual usage, with readings taken every 5 minutes. As you can see, our usage curves upward over the first hour that we're open and then hits the dotted line. Then we stay there until shortly after we close. Based on this data, I believe we should pay for a larger Internet connection."

I'm sure you can imagine other situations similar to these, but here are a few more: Justifying replacement of 100Mbps switches with 1000Mbps switches. Tracking down which device is flooding your network with poorly configured multicast traffic (rendering it useless for everyone else) in about 10 minutes. Figuring out if the lag you're experiencing is network congestion on your servers or a "full" Internet connection or if you just have too many devices on too few wireless access points.

These are all situations that you might really face. They're all situations that you can handle with aplomb if you set up network graphing. By looking at graphs of how much traffic is going through each switch in your network, you can quickly spot patterns that might otherwise be invisible.

If you don't know where to start, then I recommend checking out Cacti. By installing it on a server of your choice, you can start building graphs through a web app. For example, I started up my favorite free Unix-like system (FreeBSD) on a virtual server, installed Cacti quickly from the FreeBSD ports collection, added SNMP version 1 / read-only community names to all of my switches (easier than it sounds,) and started adding them to Cacti through a nice web-based interface. It was surprisingly easy, even though it took some time. I'd recount how to do it for you, but the reality is that other people on the Internet have already done a better job. Find a guide for your preferred server OS and give it a try.

The bottom line here is this: Even the most talented systems administrator doesn't know about the things they're not measuring. Make your systems measure themselves so you can make better decisions -- especially when speaking to your manager or anyone with the ability to shape the budget. If you're not sure where to start, try Cacti, because it's free, not overwhelmingly complex, and has enough ability that many professionals prefer it to the commercial products.

Tuesday, February 23, 2016

Data on Google Classroom Usage

Recently, I mentioned the GCRmanager add-on for Google Sheets to an online group and was surprised at how many people didn't know about it. So I thought I should share it here.

If you have Google Apps for Education (GAfE,) you have access to Google Classroom. It isn't as feature-filled as Moodle, Blackboard, Schoology, et. al. However, it is very effective.

I spent years trying to get teachers into using Moodle, for example. It offered so many options that the average teacher didn't know how to leverage it. It was like going to a restaurant and being given an 18 page menu. It can be daunting, especially now that teachers are overloaded with so much red tape.

When Google Classroom was released to all GAfE customers in summer 2014, it was amazingly simple and direct. I told my faculty, "It makes what you are already doing with Drive easier." And with that, it took off. We had lots of teachers trying to find ways to make life easier -- handing out worksheets, collecting essays, making announcements, and giving students a way to pick topics for the next assignment off a list.

The quirky thing was this: The same simplicity that made Classroom catch on with teachers also made it hard to get a "big picture" look at things. As the head of Information Technology and an adviser to school administration, I wanted to be able to say how many teachers used it recently, how many used it at all, and how many didn't even try. Fortunately, someone made GCRmanager.

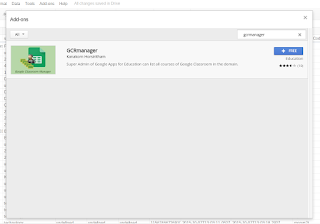
GCRmanager is an Add-on to Google Sheets. To get it, open a new file in Google Sheets. Then go to the menu bar, click on "Add-ons", and then "Get add-ons..." At this point, you'll be given an app-store-like experience that shows tools to extend Google Sheets. Search for "GCRmanager" and add it. Then close the Add-ons window. This adds "GCRmanager" to your Add-ons menu inside any and all Google Sheets files.

Since you're still in an empty Sheets file, now is the time to give GCRmanager a try.

Just click on "Add-ons", then "GCRmanager", then "List All Courses." This will take a while to finish. Possibly a long while. Give it time. When it is done, you'll have a line on the spreadsheet for every Google Classroom "class" that was created in your GAfE domain. It will include a lot of data you probably don't care about, like class ID# and owner ID#. It will also contain a lot of interesting information, such as the classes' owners, date created, date last updated, how many students are enrolled, if it is still active or archived, etc. Assuming that your faculty is using sensible class names, the name, section, descriptionHeading, description, and room columns could be useful, too.

At this point, you can keep the Sheets file for reference of Classroom usage at that point in time and make new files from time to time.

Tuesday, January 12, 2016

Packet capture on chromebooks

The excellent Stephen Gale shared a great tip recently on Google+.

In short, if you have a chromebook and were wishing for some packet capture software or other good network debugging tools, you just need to type "chrome://internals" into the address bar. There are also some great tools in Developer Mode, if you want to go that route. If you only want to know details about the current tab or page, you can go to the Developer Tools (which is different than Developer Mode, despite the similar names.)

Tuesday, January 5, 2016

Disable iCloud Login Prompt

In order to assist users in accessing Apple's online tools, MacOS prompts users to login to iCloud the first time that they login to a Mac. This can be very helpful for home users, but is largely in the way in multiuser environments, such as most schools. In corporate environments, it can even be against the data management policies (which safeguard the company against data leaks and break-in) or HIPAA or FERPA (depending on the institution.)

To disable the iCloud login prompt, just issue this command on each Mac as its local administrative account:


sudo defaults write /System/Library/User Template/Non_localized/Library/Preferences/com.apple.SetupAssistant DidSeeCloudSetup -bool TRUE

I do this via a shell script in Deploy Studio. In fact, I actually use a really nice script (see link below) with execution delayed until after first restart. This makes sure that the system is booted from the internal drive when the script is executed.

This could also be done by a scripting (or a postflight script in a PKG installer) delivered via Apple Remote Desktop (ARD), Munki, Casper, FileWave, etc. This technique would work well if you needed to implement this change on a set of Macs that were already in service.

If you use ARD, I recommend taking the additional step of adding the script to your setup process in Deploy Studio, Munki, etc. In the case of Munki, Casper, FileWave, etc. you're probably already in good shape. Just see if there is a way to schedule the script too execute early in the list of things to be installed. Otherwise, someone may login to the Mac before the script it loaded. For example, in FileWave you could set to activation date to be before any other filesets.

For a really good implementation of this idea, check out the script on this excellent post. The author does a great job of adjusting every existing user template and account on the Mac. So if you create local accounts (e.g. "student", "teacher", etc.) then this is a way to address that use-case as well. If you use Deploy Studio to image a Mac and CreateUserPKG to create accounts, just be sure to add this script to the workflow after the step with the user packages.

I like this script because it is very adaptable. Whether your accounts are on the local drive or a network system like Open Directory or Active Directory, the script takes it all into account. This reduces the chances of problems if/when you have to change your account management in the future.