Showing posts with label chromebook. Show all posts

Wednesday, May 24, 2017

Google Cloud Print and Web Filters

At work, I have three LANTronix XPrintServer systems to make printers available to our chromebooks -- one for each school's printers. Recently, two schools' printers were listed as "Offline" and one wasn't. I eventually realized that my web filter was interfering with the keep-alive traffic between the devices and Google. The working system was already exempted in the web filter, so I added the other two and their printers became available almost immediately.

In the past, we would restart the devices and complain about how unstable GCP seemed to be. Now I'm starting to wonder if this might be the root cause of that apparent instability. If the filter blocked even one keep-alive signal, it would make sense that it would knock things offline indefinitely.

So if you use GCP and some kind of server to control it (Google Cloud Print Service, PaperCut, uniFLOW, XPrintServer, etc.) you might want to exempt its traffic from your web filtering.

Tuesday, November 29, 2016

Google Drive and a Second Chromebook

When you buy a Chromebook, it usually comes with a two year upgrade of an extra 100GB on your Google account. What I didn't know, was if you could use the promotion again after the two years ended.

For example, I signed up for a free preview of YouTube Red a while back. When the preview was over, I happened to have a Chromecast and there was a promotion for a free month of YouTube Red for Chromecast owners. Unfortunately, I couldn't sign up for that, because I was no longer considered a "new" subscriber.

In 2014, I received a chromebook that had a bonus 1TB upgrade for Google Drive for two years. I gave it a try and the two years ran out very recently. Before it ran out, I bought a new chromebook. I'll skip the story of why I did this. What matters is this: It also had a bonus 100GB on Google Drive for two years. So when my two years of the 1TB upgrade ran out, I went to the Chromebook Goodies website from the new chromebook to see if I could redeem the offer. At worst, it would only be for new users, like the YouTube Red promotion mentioned above.

Fortunately, I was able to redeem the offer. It seems that Google doesn't care if you're a new user or an existing one -- only that you bought a chromebook.

So if you're the kind of person who would pay $2 each month for the 100GB of extra storage, then this is like an extra $48 off the cost of the chromebook every two years. I've seen decent chromebooks for as little as $200, so this can be a significant fraction of the cost. Even some of the nicer chromebooks are in the $300-$400 range, which would make this a 12% - 16% discount.

Side note #1: Keep an eye open for a "security checkup" deal with Google in February. In February 2015 and 2016, they offered an extra 2GB of storage for anyone who did this. I did it both times and I now have 19GB of free space in my account, in addition to the 100GB promotion from my chromebook. (Yes, a total of 119GB of storage for things I was going to do anyway.) The security checkup was a series of questions that you should probably check on anyway, so I highly recommend doing this if they offer it again in February of 2017.

Side note #2: If you have an old G Suite account from when they were free (back when it was just called "Google Apps" and they gave you 100 free accounts), this promotion will work. I'm using it with my account, which I registered in 2008.

Tuesday, January 12, 2016

Packet capture on chromebooks

The excellent Stephen Gale shared a great tip recently on Google+.

In short, if you have a chromebook and were wishing for some packet capture software or other good network debugging tools, you just need to type "chrome://internals" into the address bar. There are also some great tools in Developer Mode, if you want to go that route. If you only want to know details about the current tab or page, you can go to the Developer Tools (which is different than Developer Mode, despite the similar names.)

Tuesday, June 30, 2015

Free Chromebook Inventory Tool

If you manage chromebooks (or other ChromeOS devices) in a Google Apps for Education or Google Apps for Work system, you need this tool.

The Chromebook Inventory Add-On for Google Sheets allows you to quickly make a spreasheet of your managed chromebooks. You can then edits the spreadsheet and export it back to the Google servers. When the export is done, it will update those settings. This makes it a convenient tool to do bulk updates, move large numbers of chromebooks to a new OU, make inventory files, or make checklists.

I couldn't explain this system any better than the seven minute long video that they provide. So just check that out.

Tuesday, June 2, 2015

PowerSchool Gradebook on Chromebook

This school year, I had a few high school teachers beginning to use chromebooks as a full-time tool. Generally, there were two complaints: They weren't able to print and they couldn't run the (Java based) PowerSchool gradebook program. The printing issue was simply because I hadn't set up any Cloud Print compatible printers yet. Accessing their gradebook, on the other hand, was a more interesting challenge.

One day, I had an idea. Its a huge "hack," but it works. We used a service called rollApp to remotely run a Firefox & Java capable environment and, from that, we could run the gradebook. Its a bit like the matryoshka Russian nesting dolls.

First, from the chromebook you visit rollApp. Then click "Login" and click on the Google logo. This will allow you to quickly login using your Google account and save you from having to remember Yet Another Password. This even works with accounts in a Google Apps for Education system.

Second, once your account is set up, run the rollApp version of Firefox. This will cause Firefox to display on your screen, but its actually running on the rollApp server and using their memory, CPU, etc.

Third, once Firefox is on your screen, go to your PowerSchool system and login. Then run the gradebook program.

The first time you do all of this, it will take a while. The next time, though, there are a few fewer steps. For example, you won't have to agree to so many things and Firefox will be in your list of recently used rollApp programs.

Important Note: As stated above, the gradebook is running on rollApp's servers and not your chromebook. Its only visible from your chromebook. This means that you've allowed rollApp to see you typing in your PowerSchool password. You have to decide if they are trustworthy enough for that. Check with your Information Technology department. There may be a district policy that could guide you on this topic.

It is my hope that PowerSchool will eventually have an HTML 5 version of their gradebook so that this hack isn't necessary. If they even came out with an Android version of the gradebook, that could be ported over to ChromeOS quickly via the Android Runtime for Chrome. So, with any luck, this idea will not be needed some day. For now, however, its an option that you can consider. Just make note of the potential security issue and check if your district has a policy on this before you begin using it.

Friday, May 22, 2015

iPads on Chromebooks

I learned an interesting thing recently. A teacher I work with connected an iPad to a chromebook's USB port. I was pretty sure that it wouldn't do much other than charge the iPad off the chromebook's battery, but I was wrong.

Trying to show the teacher that she couldn't synchronize data between the iPad and chromebook that way, I opened the Files program on the chromebook. In Files, in the same sidebar area that Google Drive and other things appear, there were two listings for the iPad. When I clicked on one, nothing showed up. When I clicked on the other, a DCIM folder showed up. Most digital cameras store their data inside a folder named DCIM and it appears that iOS follows this standard. So ChromeOS basically said, "OK, here are the photos on that camera you just connected," and offered up the files. We were able to drag-and-drop them into Google Drive, allowing her to copy them over.

Of course, she could have done this with the Google Drive app for iOS. This USB method does have a few advantages, though.

For one, it allows a teacher on a chromebook to collect photos off of their students' iPads. No accounts are required. You don't even need software from Apple's App Store. This could be useful in schools that provide iOS devices (e.g. iPads or iPod Touches) to younger students. It could also be helpful for people who have iPads but don't use Google Apps for Education. In that situation, the students wouldn't necessarily have Google Drive accounts to upload their photos into. There are also situations when students don't have Apple accounts and, therefore, can't download apps like Google Drive from the App Store.

I suspect there are other potential uses for this that I'm not thinking about right now. If you have any, please tell me about them in the comments section below so that other readers can benefit, too.

Tuesday, April 28, 2015

YouTube Use in Schools

Recently, GoGuardian published this interesting analysis of YouTube usage over a sample set of a few hundred schools. Its well worth a read, just to see how the younger crowd views computers in general and YouTube in particular.

Side note: If you use Chromebooks (or their desktop cousins, Chromeboxes) and haven't heard of GoGuardian, you should give them a look. It might not fit your institution's needs, but they have interesting enough features that they could be useful.

Tuesday, April 7, 2015

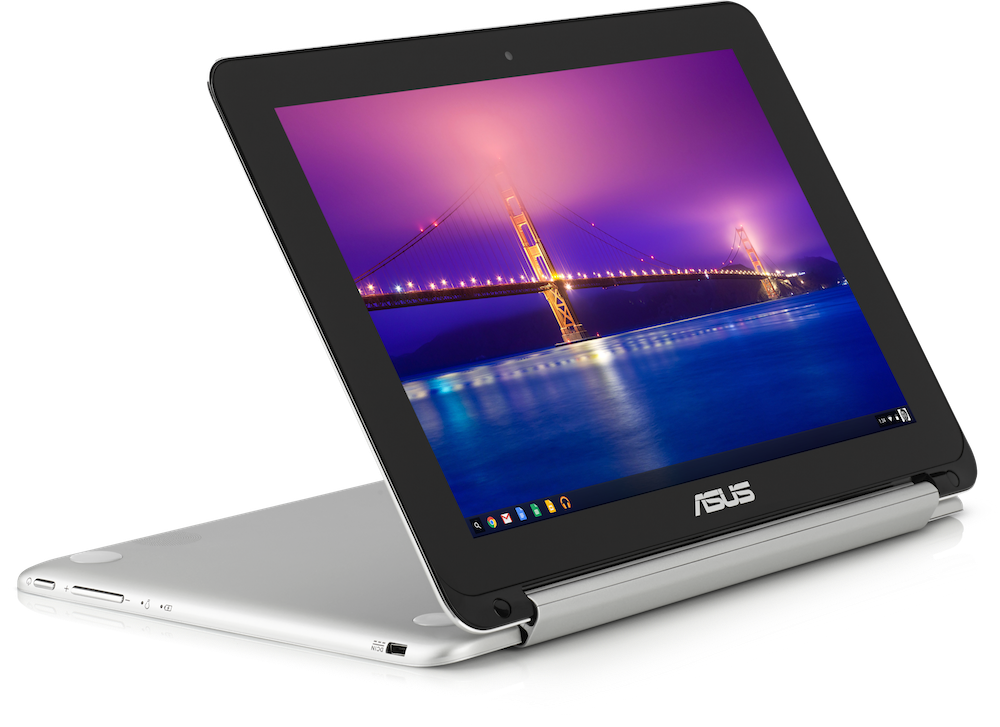
Chromebook Flip from Asus

I'm a fan of ChromeOS based computers, like the chromebook, especially when paired with Google Apps For Education. They're a capable and low maintenance combination that allows Information Technology staff to focus on things that are closer to the institution's core mission and not installing software, upgrading servers, recovering lost files, preventing/removing malicious software, etc.

Sometimes, though, a touch screen system is a better tool. So it was of great interest to me when my team deployed the Lenovo Thinkpad Chromebook Yoga 11e to dozens of my teachers in the 2014-2015 school year. I really wanted to see what the teachers could do with such a "convertible" style of computer that could combine Chromebook and tablet features.

At the time, there were only three touch-screen chromebooks: the Yoga, the Pixel, and the Acer C720P. They were all excellent notebook computers, but the Pixel was prohibitively expensive and only the Yoga could mimic a tablet. That is about to change.

Asus has announced the Asus Chromebook Flip, to be released in June 2015. Its a $249 chromebook with 4GB of RAM. That is a pretty good deal already. Their other 4GB RAM chromebooks (the C200 and C300) cost more than that. The Flip, however, comes with a touch screen and converts into a tablet just like Lenovo's Yoga. This nearly halves the price of a convertible chromebook when compared to when we bought them for our teachers just a few months ago.

The Yoga is probably a bit more durable, especially its keyboard and non-metal chassis. The Yoga also has a 15% larger screen. It might be the better computer for adults. However, for younger students the 10.1" screen might be fine. The Flip's cost also matches the low end of what we typically spend on chromebooks for student use. So adding the convertible nature of these models and some Android software (Android-programs-on-Chrome project) and Google Play For Education, we end up with a very nice package.

I don't know about anyone else, but I'm looking forward to the idea of a chromebook for K-5 students which doubles as a tablet, costs the amount of a 2 year old iPad mini even though its brand new, runs Android programs (which are as numerous and diverse as iPad software these days), is the size of a full iPad Air, and has that full keyboard that is required for computer based testing. It sounds like the perfect way to help students transition from "what I use at home for casual web browsing and games" to a more serious "what I need to do research, take notes, and build large projects." Like putting the computer on training-wheels.

Tuesday, March 31, 2015

Managing ChromeOS Users & Alternate Accounts

Part of this article is relatively obvious, but there is an interesting tip about users switching between accounts.

Once a user logs into ChromeOS, they can add a second profile for a different Google Account and toggle between them. This is much like using profiles in Chrome for Windows or Mac. The article gives directions on how to block that and other user login controls.

Honestly, I'm not sure what the negative impact would be if users were allowed to login to your domain and then add an account that isn't in your domain. If they want to separate their work and personal lives, I consider that to be a good thing. The only advantage I can see is if your institution has a set of users that are being monitored (e.g. students who are minors or an employee on an improvement plan) and you need to prevent them from circumventing that monitoring. For example, if you use GoGuardian in a school setting, this could help.

At the moment, I'm not inclined to use the tips in the linked article. However, I'm leaving this link here in case it could benefit any on me else or in case I change my mind and want to do this in the future.

Tuesday, January 27, 2015

Chromebooks For Young Students

Chromebooks are a marvel of low maintenance. They require almost no effort to get running or keep running and have all kinds of advantages. However, logging into them can be a challenge for the youngest of students. Typing a username like "john.doe@myschoolname.org" is a bit much for a kindergarten student. It can even pose a challenge up to 2nd grade.

In this article, I want to show two solutions that I came up with. My teachers were extremely grateful when I rolled out the first one in 2013. Since rolling out the second in 2014, they've barely stopped thanking me. Both approaches are free and only require that your chromebooks are enrolled in a Google Apps For Education domain -- a very common thing.

First Steps

First, you have to identify which chromebooks will be effected by this setup. In my case, there were two carts of chromebooks used by kindergarten through second grade. This was the obvious choice for me, since we start teaching students to login with their own accounts a few months into second grade. I was fortunate, because K-2 are the only grades using these two carts and they only use these carts.

Once you've identified the chromebooks you want to effect, go to admin.google.com and create an organizational unit (OU) to isolate them. OUs can be hierarchical, so feel free to arrange things however you need. In my case, I made an OU called "Devices", then sub-OU called "Schools" and "Digital Signage" and "Special Cases" and so forth. Within "Schools", I made a sub-OU for each school and then a sub-OU for each cart of chromebooks.

It took a bit of time to do this and then file each chromebook into its relevant OU, but it pays off in the long run. There are a lot of time when applying a setting to just one lab or just one school is exactly what you want to do. This groundwork makes that possible.

One last point before I move on: Talk to your stakeholders. Sometimes the teachers are aware of things that the technical support folk aren't. Don't get into too many technical details, but ask them about their computer use patterns. The right OU structures should become obvious once you do this.

Guest Login

Now that you've laid a good foundation, then next step is pretty easy.

In the Google Apps For Education (GAFE) controls located at admin.google.com, go to "Device management" then "Settings". On the left side, select the first OU that you want to effect. Then go to "Guest Mode" and change it to "Allow guest mode". Click "Save changes" at the bottom. Repeat this for each OU that you want to change.

After the next reboot, the chromebooks' login window should have changed. If you had the kind of login window that has two blank text fields for name and password, it will now have a bit of blue text on the right side. It says "Browse as Guest". If you previously had the kind of login window that shows icons of each user, then you'll have a "Browse as Guest" button on the lower-left corner.

Either way, the effect is the same. A student clicking on Browse as Guest will be sent to an Incognito window. This means they don't have to remember a password and they don't have to type a long (for a 5 year old) email address. However, this also means that you can't look up their browsing history nor can you know who used the chromebook last. So there are trade-offs. However, for the very young students these trade-offs can be very worthwhile.

If you'd like, you can stop here. Show your teachers this new option and you're all done. Its a huge improvement and they'll probably be grateful for it. However, if you want to take this to the next level, keep reading.

Next Steps

My teachers used Browse as Guest happily for a year. They eventually started telling me that having students type in "www.example.com" took a long time. Students didn't know where the letters were on the keyboard and didn't know how to spell things. This was in the back of my mind on the day I discovered Public Sessions. I realized that we could much go further.

Using Public Sessions, I could make a chromebook as easy to use as a tablet. I can't understate this. This is huge.

One of the reasons that teachers in the early grades like tablets is that they are a big screen full of buttons. The student presses the button for the service they want and then they get it. No login window. No typing URLs. Its just there. And the teacher can customize and streamline the experience.

Using a mix of Google Sites and Public Sessions, chromebooks can have this advantage, too. If you have touch-screen chromebooks, then you've basically made a low cost, low maintenance tablet with a keyboard.

Get Feedback

First, ask your target teachers what sites they use regularly. These are the URLs that teachers have been typing into the chromebooks for the students. These are the sites that you're going to make easy to access.

Once you have that list compiled, send it to them. Ask if anything was missed.

Now look for a pattern. Does each grade level have its own list? Would it be best to arrange them by subject? The purpose here is to figure out how you want to arrange the icons on the screen.

Google Site

Next, make a Google Site using logos for each service. Arrange the logos in a way that makes sense to you. Don't over think it. Just get them on the page. Then email the URL to your new site to your teachers. Ask what they think. Say something like, "I'm looking at a way to make the chromebooks easier for the really young students. It would look like this: [link]. What do you think?"

Ask questions that get their thoughts flowing. Listen to the feedback. Make changes. Send them the new version. Repeat this feedback cycle until they are happy. This feedback cycle makes the teachers much happier with the results. It takes a few days or weeks, but its well worth it.

Just to give you an idea of how much the feedback matters, consider my first and final drafts. The first idea was to have three rows of icons and to color code them based on grade level. By the time we were done, we moved to a much different design that was less flashy but more effective. In part, this was because there were some sites that were used at several grade levels, so the color coding didn't work out. See what I mean in the images below.

First draft:

Final draft:

The point? Don't over-think things. Let the teachers be your guide. Its less work for you in the long run and it makes a result that they'll be happier with.

Public Sessions

Once you have your Google Site completed, we move back into the more technical aspects of the process.

You'll need a testing environment. Get a single chromebook that you can use for testing your settings. In admin.google.com, make a new OU and place only this chromebook into it. We'll make all of the changes inside this OU for now, so you can perfect your system.

Go to "Device management" and then "Public session settings". Select the OU that you just created. Name the session that you want the teachers to see. I used "Kiosk", but "Dashboard" or "Springpad" or "Quick Launch" are all fine. This is what some people call "branding." Its the word that you want people to use when they think of this service you're creating. You can come back and change this latter, so don't over-think it right now.

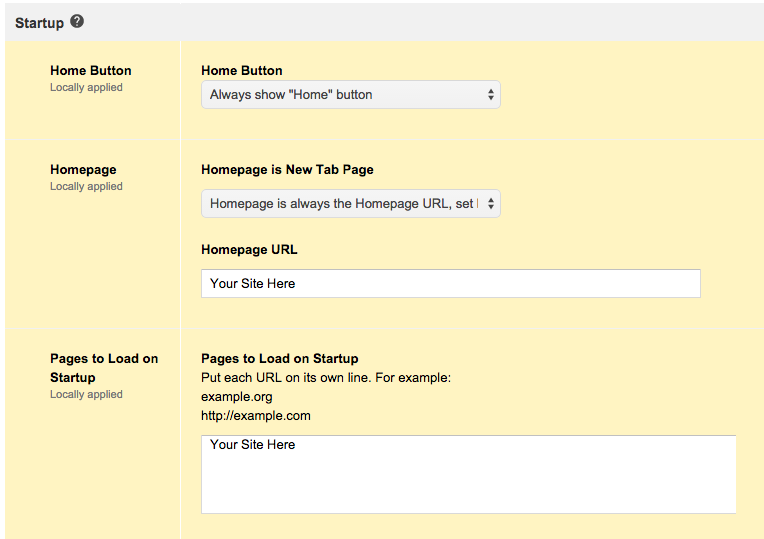
Next, scroll down to the "Startup" settings. For "Homepage is New Tab Page" set it to "Homepage is always the Homepage URL, set below". Then type in the URL to your Google Site. Enter the same URL under "Pages to Load on Startup" as well. Then save your settings.

Now go to "Device management" and then "Device settings". Select the OU for your testing environment again. Set "Public Session Kiosk" to "Allow Public Session Kiosk". Save your new settings.

Go to your testing chromebook. Restart it so the new settings kick in. There should now be a new login window. It should just say "Kiosk" (or whatever your public session is named). Click on that and then the next button. You should go straight to the Google Site you made.

If this worked, its time to polish the settings. Sorry, but I have to be vague here. The settings that work for me might not work for you. Things that I considered include "Auto-Launch Public Session" (in Device Settings) and various settings in the Public Session (such as idle logout, avatar, wallpaper, etc.) This is why you need a testing environment. Keep making changes and then looking at the results. See what works for you and what doesn't.

Next, and perhaps most importantly, get teacher feedback. Ask for a 15 minute after-school meeting with that team of teachers. Show your test system to the ones that show. Ask what they think. Point out things you can adjust, such as the Google Site's contents and layout, the avatar icon, the idle logout period, the session name, etc. Take notes of their suggestions. Ask the group for a consensus. Then let them know what changes you'll make and let them know about when you'll roll out the changes.

Make the changes that you agreed to and test them. If everything is working, you have everything you need. On the afternoon before the scheduled rollout, make new public sessions in the OUs that you want to effect. Just copy over all the settings. (Unfortunately, this has to be done manually.) Then enable the public session in the device settings and you're all set.