Wednesday, January 25, 2023

How Wifi Works

I've been following the MacAdmins Conference on YouTube for a few years and many of their panels are just excellent. Even if you don't use any products from Apple, many of their topics are things that any systems administrator might need to learn, like networking, documentation, and project management.

I have recommended one of their videos many times. It does a great job of explaining the physics underneith wifi and I think that really helps people appreciate just how complex it all is. It is also very helpful for building an understanding of what issues you may come across and how to correct them.

Sunday, October 9, 2022

FileWave and Let's Encrypt

Let's Encrypt offers free SSL certificates. These are usually used for websites, but they can be used for other things. Here I demonstrate how I made them function with FileWave. This removes the need to (a) manually install new certificates every year and (b) pay for those certificates.

For the unfamiliar, FileWave is a tool for managing your endpoint computers. It can send files, run scripts, install programs, update the OS, and other "overhead" tasks for Windows and MacOS. It can also act as an MDM for any of Apple's platforms (e.g. MacOS, iOS, iPadOS, etc.) as well as Android. In order to function properly, it needs to have secure connections between the endpoint devices and the server which coordinates these actions. Usually you would buy a certificate to achieve this and have to replace it every year.

However, Let's Encrypt intentionally designed their system so you could automate the renewals and they don't charge for their certificates. This makes it the perfect tool for eliminating this manual work and reduce your upkeep costs. I run FileWave on CentOS and I use Certbot to automate renewals with Let's Encrypt, so I'll show how I used those tools. If you're running a FileWave server on a Mac, these general ideas should be easily adaptable. The Certbot website gives directions on how to install it on Macs using Homebrew.

First: Install Certbot

Go to the command line on your FileWave server and install certbot. You can find directions on Certbot's website. Specifically, I followed the directions for CentOS 7 and "other" applications.

Make sure that any firewall or packet filtering settings on your server are going to allow Certbot to work. For CentOS 7, I used these commands:


sudo firewall-cmd --add-service=http --permanent
sudo firewall-cmd --reload

Second: Get A Certificate

At this point, you should be able to get a certificate for the server. Remember that it must have a public IP and a publicly resolvable hostname. Otherwise, Let's Encrypt can't issue it a certificate. To get the certificate, run this command and answer the questions.


sudo certbot certonly --standalone

Assuming your hostname is filewave.example.com, then you'll have certificates in /etc/letsencrypt/live/filewave.example.com. This is fine for some programs, but the FileWave server needs to be "tricked" into using it. That takes a few steps. First, move the original self-signed certificate out of the way. Second, replace it with the certificate that Let's Encrypt signed for you. You can do that with these commands:


sudo -s
cd /usr/local/filewave/certs
mv server.key server.key_bak
mv server.crt server.crt_bak
cp /etc/letsencrypt/live/fielwave.example.com/fullchain.pem server.crt
cp /etc/letsencrypt/live/filewave.example.com/privkey.pem server.key
/usr/local/bin/fwcontrol server restart
exit

At this point, you might be asking why I didn't just use symbolic links. I tried that first, but the dashboard in FileWave Admin claimed that an SSL certificate wasn't installed.

Third: Automate Certificate Renewals

Lastly, to make sure the certificates renew themselves a few weeks before they expire, you'll need to make a script to renew the certificates and move them into place periodically. You could run this every day or every week, as you prefer. You'll need to adjust the script's FQDN variable to be the fully-qualified domain name of your server, but it otherwise looks like this:


#!/bin/bash
FQDN="filewave.example.com"
/bin/certbot renew
cp -uf /etc/letsencrypt/live/${FQDN}/fullchain.pem /usr/local/filewave/certs/server.crt
cp -uf /etc/letsencrypt/live/${FQDN}/privkey.pem /usr/local/filewave/certs/server.key
yes | /usr/local/filewave/python/bin/python /usr/local/filewave/django/manage.pyc update_dep_profile_certs
/usr/local/bin/fwcontrol server restart
exit 0

Save the script at /usr/local/bin/certbot-renew.sh. Also, run "sudo chmod +x /usr/local/bin/certbot-renew.sh" to make sure it is executable. Then make it run every morning by adding this line to the bottom of /etc/crontab:


0 5 * * 6 root /usr/local/bin/certbot-renew.sh

References

Some of the above was put together thanks to things I read from the following sources.

  1. https://community.letsencrypt.org/t/script-that-has-been-working-for-years-stopped- working-after-feb/122142
  2. https://github.com/nycon/filewave-installer/blob/main/filewaveAIO.sh

Sunday, April 4, 2021

Discussions on Staffing I.T. Departments

Note: In addition to this article, you may wish to read what I wrote on this topic back in 2014.

Several times each year, I find someone asking how large of an I.T. department they should have. Typically it is someone in the I.T. department trying to navigate this question so they can advise decision makers about their budget and/or organizational structure. This is a complicated question and sometimes the answers aren’t accepted because the intuition of the various people in these conversations can be very different.

What I’m going to do here is try to provide a neutral perspective that helps the involved parties have a constructive conversation. I’ll avoid error prone simplifications such as a devices-per-tech ratio, my personal intuition, and comparisons to similar organizations. My process takes a while, but if you stick with it I think it will help. It is based on inspiration from other neutral parties. I’ve included two of those sources in the notes at the end of this article. I encourage you to look at those worksheets to get an idea of how the process can look. Be aware that they may make assumptions that are different in your particular environment. By contrast, I propose a process that you can adapt to your individual situation.

Step 1: Conversations and Goal Setting

Much like a good Disaster Recovery Plan or Business Continuity Plan, the institution needs to start with it’s objectives. Here are some questions to get the conversation started:

  • What services are to be provided?
  • Which of those services are custom made and which are commodities?
  • What is the scale of each service? Is it only used by some secretarial staff, all employees, or the public?
  • How long of an outage is the institution willing to allow for each service? How frequently?
  • Are all matters of routine upkeep expected to happen during off-hours? If so, when are off-hours?
  • How many end-point devices will be in active service at any one time?
  • How long is an acceptable waiting period between asking for technical assistance and receiving it?
  • During what hours is technical support expected?
  • Will you provide support to guests, such as people connecting to your wifi or projectors?
  • How many templates of devices will you have? For example, perhaps you have high school student chromebooks and elementary school classroom iPads and cafeteria point-of-sale computers and office secretary computers and so on.
  • How many “bespoke” computers will you have which require custom attention? For example, does the PC running athletics events live streaming or the HVAC system require unique software setups that are not automated and centrally controlled?
  • Do you force all end-users to store data on backed-up servers or is valuable data stored directly on their end-point devices? If the data is on the end-point devices, do you expect technical support to recover the data if the device is upgraded, replaced, or damaged?

Taking a closer look at those questions, you’ll find that the answers aren’t always obvious. Consider the question “How many end-point devices will be in active service at any one time?” This could include desktop computers in offices, chromebooks and tablets assigned to students, labs, and even the computers that run software for your test scanning software, athletics event livestreaming system, and HVAC controls. Do teachers have a mobile device assigned to them as well as a desktop device in their classroom? Do you count the “spare” devices that you give to users when their current device breaks?

Let’s look at the questions about when outages can occur and when technical support is expected. If you’re answering for a school, this may seem obvious. Technical support is only needed when there are students around and outages can happen when class isn’t in session, right? Do you mind an outage while teachers are writing substitute teacher plans and using the copier 30 minutes after school dismisses? Will you expect technical support for the parent trying to connect their phone to your wifi during a basketball game at 6pm? How does the institution feel about an upgrade starting at 5pm which also happens to cause the livestream of a basketball game to “drop” for 15 minutes? Will the superintendent want technical support at Board of Education meetings at 7:30pm? Should system upgrades happen on Sundays in order to avoid impacting classes? If so, will you have any athletics events which are livestreamed and offer wifi to visiting parents?

I hope I’ve shown that there are a lot of situations that we take for granted and might not consider at first. This is why the goals should be defined up front. Otherwise, everyone will be unhappy with the results: management, I.T. staff, and the people that they serve alike.

Step 2: Making Lists and Numbers

Start simple. Make a list of every service you can remember. Give yourself a week or two to think of them all. Ask others to add to it. Look at the calendar and ask what services you need to worry about in each month, quarter, or season.

Do the same for every hardware category. Start with the obvious: desktops, laptops, tablets, printers, network switches, wifi access points, etc. You'll eventually remember things you don’t think about often. Phones, PA systems, fire alarms, cafeteria point-of-sale computers, copiers, fax machines, etc. are all easy to overlook at first but remember later, after you've walked through that office for unrelated reasons. Look through your asset management system (a.k.a. inventory database) and see what you might have missed. Make it a constant thought for several weeks.

As you find items, fill in a quantity where relevant (e.g. copiers but not software), the duration that your institution would be willing to have it unavailable (a.k.a. "return to service" time or RTS), and how much time it takes to maintain each day, week, month, and/or year.

For example, I might say that we have 10 copiers, we can't go without them for a full day (i.e. RTS tolerance is 8 hours), at least one needs service every month, it takes about 0.5 - 3 hours each time, and so on. I might also say that we have uniFLOW for managing those copiers, that it takes about 4 hours per month to manage the application, and another hour or so per month to manage its OS (Windows updates, etc.) So now I can see that the service of "copiers" takes about 5.5 to 8 hours per month of personnel time. I'll take the high number, otherwise I'm not planning appropriately for the target RTS. That 8 hours/month is roughly 0.06 FTE for regular operations. To come to that conclusion, I assumed 4 weeks per month. I also assumed 35 working hours per employee day after removing lunch breaks. That makes:

8 hours / (4 weeks x (35 hours/week)) = 0.057

Replacements, which happen every 5 years or so, are obviously going to be a larger drain on personnel time. So I make a note of that in this section of my data.

Do this for each service in the list that you’ve made. In this way, you quantify each service's required personnel. Right now, 0.06FTE seems like a rounding error, but it will add up. If we decide to hire more staff, it will also help us decide on the division of job duties throughout the department’s positions.

Next, calculate the impact of sick days and vacation time. For example, maybe you give 4 weeks of vacation time annually and assume each employee takes 1 to 2 weeks of sick and personal time annually. So that makes 46 out of 52 weeks, or 46/52 of a year, or about 88-89% of the year that any employee is present. This is very rough, since I'm working in weeks and not actual work days on the calendar. Now that means you'll need to increase any employee requirements by about 10% in order to continue to maintain expected levels of service during vacations, etc. The amount of vacation time and number of holidays your institution gives will influence the math, so the above is only a demonstration.

Step 3: Reviewing and Revising

When you reach this point, your team of stakeholders will have a spreadsheet full of data, justifications, and the tools for transparent conversations with Human Resources and the budget making leadership. Now instead of opposing opinions, people working in good faith can have informed conversations. You can have conversations such as:

  • What is the value of increasing the staffing budget vs. decreasing the RTS goal?
  • Should you consider changing the guidelines for when scheduled outages may occur?
  • What services should be outsourced to keep your limited staff focused on the core mission?

In essence, you have built the formula and the data that goes into it. You can now “turn the knobs” to change the outputs and see what you might want to achieve and what you’re willing to pay (in money or time) to get there.

This process can also be used in future conversations about adding services. Want to change from unmanaged copiers to a system with accountability, printing limits, automation, and more? Do the math to figure out the impact on your FTE for different levels of expected service, different RTS targets, handling it in-house vs. outsourcing the service, etc. This doesn’t just address one conversation. It equips you to have better conversations internally and with vendors about any projects you may consider in the future.

Footnote: Outsourcing

It is worth noting that outsourcing a service reduces the staff necessary, but it doesn’t remove all of the staff time related to it. Continuing with the example above, if staff can’t login to the copiers, the I.T. department will spend time receiving the trouble-report, confirming it, testing if it is a problem caused by their equipment or the vendor’s, and then finally calling the company which has the service contract. If an issue happens every month, that could be 1 - 8 hours per month, depending on the system’s design. They still save time performing the hardware repairs, but the other steps are still handled by the internal I.T. department. Also, outsourcing can have a negative effect on the RTS. If the person who will make the repair has to drive for two hours to get to your office, that is lost productivity. So the question of outsourcing can cut both ways. I recommend considering it for narrow and specialized services, such as copiers, HVAC, computer controlled lighting, phone services, etc. I recommend staying away from it for more flexible tasks, such as general technical support, systems administration, programmers, etc. and issues that are core to your institution’s mission.

Footnote: Inspirations

Here are some of the documents that formed my thinking. If you review them carefully, you can “see” the logic I describe above woven through the math of the worksheets. However, these worksheets contain a lot of invisible assumptions. I offer the method above as a way to adapt the philosophy of these worksheets to your particular environment.

Tuesday, March 30, 2021

Clearing User Files on Macs

In some environments, it is desirable to clear all the user created and downloaded content from a Mac when the user logs out. Perhaps there is only one generic account or you're trying to strongly encourage users to only store things on servers or online services like Google Drive. To create this effect in my environment, I wrote a LaunchAgent and a configurable shell script. I've tested this up to MacOS 10.12, a.k.a. Sierra, but it will probably work on newer versions as well.

To start, the "engine" of this system is the following shell script. Place the code in the file /usr/local/bin/clear_local_files.sh and make it executable. You might need to make this directory manually. You can do that with mkdir -p /usr/local/bin && chmod 755 /usr/local/bin. When you finish pasting the following code into your preferred text editor (BBEdit is a great option), you can save the file clear_local_files.sh to that location. Then use chmod +x /usr/local/bin/clear_local_files.sh to make it executable.


#!/bin/sh
#
# This script will clear away a lot of the files that users are likely
# to leave behind on the local disk.  This is meant as a way to encourage
# users to store files on the server, so that they aren't accidentally
# lost when a computer breaks down, is replaced, is upgraded, etc.
#

# The following is a list of directories at the root of the user's home
#   which will be cleared.
# Note:  The lack of Library allows account customizations to stay on the
#   local disk.
# Note:  Some sub-items will be moved back in a following setting.
# Warning:  Never put " in " in this list, as it will cause a syntax
#   error with loops.
clearDirs=( "Desktop" "Documents" "Downloads" "Movies" "Music" "Pictures" "Public" "Sites" )

# The following is a list of items to preserve in the user's home.
# Warning:  Never put " in " in this list, as it will cause a syntax
#   error with loops.
# Warning:  Be careful with spaces, colons, and slashes in file names.
keepDirs=( "Documents/Microsoft User Data" "Movies/iMovie data folders" "Movies/iMovie Events.localized" "Movies/iMovie Projects" "Movies/iMovie Library.imovielibrary" "Movies/iMovie Theater.theater" "Music/iTunes" "Pictures/iPhoto Library.photolibrary" "Pictures/Photos Library.photoslibrary" "Public/Drop Box" "Sites/images" "Sites/index.html" "Sites/Streaming" )

# This should be executed in the home directory of the current user.
cd ~

# Make a place to hide things.
mkdir ~/.backup0

# Move things into that hidden location
for item in "${clearDirs[@]}"
do
        if [ -e "${item}" ];
        then
                mkdir -p .backup0/"${item}"
                mv "${item}"/* .backup0/"${item}"/
        fi
done
        
# Move the things we're preserving out of the hidden location and back where they're supposed to be.
for item in "${keepDirs[@]}"
do
        if [ -e ".backup0/${item}" ];
        then
                mv ".backup0/${item}" "${item}"
        fi
done

# Get rid of anything that has been around too long.
if [ -e ~/.backup9 ];
then
        rm -rf ~/.backup9
fi

# "Age" each hidden backup by one "notch"
for index in {8..0}
do
        # Make sure it exists before moving it, to avoid errors.
        if [ -e ~/.backup${index} ];
        then
                index2=`expr "$index" + 1`
                mv ~/.backup${index} ~/.backup${index2}
        fi
done


exit

The next step is to make this run whenever a user logs out. However, it is easier to make this run at login than logout. A small difference and mostly unnoticable to the end user, so this is what I went with. To do this, I made a LaunchAgent by putting the following code into a file named com.reviewmynotes.clearLocalFiles.plist located at /Library/LaunchAgents.


<plist version="1.0">
<dict>
        <key>KeepAlive</key>
        <false>

        <key>Label</key>
        <string>org.cairodurham.clearLocalFiles</string>

        <key>LowPriorityIO</key>
        <true>

        <key>ProgramArguments</key>
        <array>
                <string>/usr/local/bin/clear_local_files.sh</string>
        </array>

        <key>RunAtLoad</key>
        <true>

        <key>LimitLoadToSessionType</key>
        <array>
                <string>Aqua</string>
        </array>

</true></true></false></dict>
</plist>

Now logout and login. Anything in the locations listed in clearDirs and not listed in keepDirs should be moved into a hidden folder called .backup1. At each login, that folder will be renamed so the number goes up by one. The folder .backup9 will be deleted each time. This gives you a chance to save people from their own mistakes.

This system can be easily deployed via tools like Munki, Jamf, and FileWave.

Wednesday, February 19, 2020

G Suite Walled Garden for Email

If you're using email in a school, one thing you should consider is blocking outside email messages sent to your students. If you're in the United States, then COPPA applies to any students under 13 years old. For most areas, this means all elementary and middle/junior high school students. Some may think that this should apply to all students. That is a decision for your district leadership team.

This goal is very achievable if you use G Suite.

First, arrange students into OUs by school, grade, and/or year of graduation. Personally, I recommend a nested approach. I place student accounts into an OU for their year of graduation. This is easily changed for the small number of students who are retained each year. Then I place these OUs into OUs for their grade. This means that I can quickly move all students to their new grade. Any grade-level configurations go onto the grade's OU, not the OU for the class-of-####. This reduces the effort when students are promoted to the next grade each year. If your district only has one school for each grade (i.e. only one elementary school, one middle school, and one high school), then you can nest the grades' OUs inside OUs for each school, too. This allows a quick way to apply settings across all grades in a school.

If you don't have students cleanly arranged into OUs yet, you may want to consider using either GAM or Gopher for Users to do this efficiently. When coupled with exports from G Suite and your student information system, these can be very effective tools. I recommend GAM for those with no budget and/or lots of experience with the Linux command line and Gopher for Users for anyone more comfortable with a spreadsheet environment.

Now that you have the ability to "aim" settings at the relevant groupings of student accounts, login to http://admin.google.com and go to Apps, then G Suite, then Gmail, then Advanced Settings. Select the OU to restrict on the left side. Scroll down to "Restrict delivery" under the "Compliance" header.

Hover the pointer over that line and the "Edit" button will appear on the far right. Click on that. New settings will appear. In this space, create a list of whitelisted domains. I called mine "Walled Garden". This list should start small and may have a few things added over time. Add your own domain here, as a precaution. Some websites used with students may require registering for accounts over email. You'll have to add those, too.

This may be obvious, but never add "gmail.com" or "yahoo.com" or other free email services to this list. If you do, it will defeat the purpose of this restriction. That said, I did end up adding "google.com" (not "gmail.com") so that students could receive notices of shared files from Google Drive.

You'll also want to add a rejection notice for email that isn't delivered. This goes in step #2 in the above screenshot. You should also check the box to allow bypassing this restriction for internal messages. Note that this applies for Gmail-to-Gmail messages, but you may have external products that technically aren't "internal," such as copiers that scan-and-email documents. This is why your domain should be in the list in step #1. When done, save your new settings. Then duplicate them for any other OUs that should have them. For easier management, I recommend re-using the same whitelist in each OU. For example, you could apply the settings to "Elementary School" and "Middle School", but use the same "Wall Garden" whitelist for each of them.

These settings now apply to both incoming and outgoing email which involve domains not on your whitelist. Note that external users (e.g. "person@yahoo.com") would receive the customized message from step #2 while internal users (i.e. your users) sending out would simply receive an "undeliverable" notice.

Tuesday, January 8, 2019

Download MacOS 10.12 (a.k.a. Sierra)

Sometimes a systems administrator needs to get specific OS installers, due to compatibility issues. MacOS 10.13 (a.k.a. "High Sierra") introduced a new file system called APFS. Apple also started making firmware updates part of OS updates. These changes can cause significant issues with using imaging tools like Deploy Studio.

Thankfully, the excellent MacOS systems administration blog Krypted.com published a way to download the version right before that. So if you need to set up imaging of Macs, this is the last version you can reliably use.

Use it for now, but start planning a new workflow to maintain your Macs; one that doesn't involve imaging. That isn't supported by Apple any more. For details on that particular challenge, look for presentations by Greg Neagle at the MacSysAdmin conference, such as this one.

Note: If Krypted.com isn't available for some reason, the recommendation was simply to use this link.

Update: If you need a different version, Krypted.com has a newer article that covers a number of other versions.

Thursday, January 18, 2018

Exporting User List from Active Directory

Sometimes you just need a simple file with a list of users in it.

In my case, I've made various programs to streamline and automate the work of my department. We "feed" one of these programs user data from Active Directory and elsewhere so it can make and delete accounts when students transfer in or out of the district.

You may not have a custom system like that, but there are many other reasons to be able to export data from Active Directory into a spreadsheet or text listing. One example would be turning over a list of users to the payroll department, so they can tell you what accounts should have been closed but slipped through the cracks. (Side note: I actually recommend doing at least annually and preferably every three to six months.)

To make such a list, login to a Domain Controller for your Active Directory system as a Domain Admin, run the command line, and use a command like this:


csvde -f ad.txt -n -d "ou=students,ou=People,dc=controller,dc=example,dc=com" -r "(&(objectCategory=person)(objectClass=user))" -l "sAMAccountName,givenName,sn,description"

That was probably too long to fit on the page, so let's break it down.

  • csvde:
    This will make a file in the current directory (a.k.a. folder.) That file is in the CSV format. To remember this command, think of it as as "CSV Data Export."
  • -f ad.txt:
    This file will be named "ad.txt".
  • -n:
    Any binary data is excluded.
  • -d "ou=students,ou=People,dc=controller,dc=example,dc=com"
    It will limit itself to data in the Organizational Unit (OU) named "students", which is inside "People", and in the Active Directory system at controller.example.com.
  • -r "(&(objectCategory=person)(objectClass=user))":
    It will limit the export to only user accounts. For example, if there are computers or groups in that OU, those will not be exported.
  • -l "sAMAccountName,givenName,sn,description":
    Its columns will be the username, the first name, the last name, and the description. Note that the first name is labeled "givenName" and the last name is labeled "sn" as in "surname."

If you want to change the OU, just adjust the part after the -d to include your OU and DC structure. If you want to change the data in the export file, just change the part after the -l. To learn more details, check out Microsoft's article on the csvde command.

If you adjust this to suit your environment, you should be able to generate CSV files that list your users very quickly. At my job, we can export over 1,000 users in under a minute. The CSV file can be read by scripts we write or imported into a Google Sheet and shared with Payroll for a quick account audit.

Wednesday, May 24, 2017

Google Cloud Print and Web Filters

At work, I have three LANTronix XPrintServer systems to make printers available to our chromebooks -- one for each school's printers. Recently, two schools' printers were listed as "Offline" and one wasn't. I eventually realized that my web filter was interfering with the keep-alive traffic between the devices and Google. The working system was already exempted in the web filter, so I added the other two and their printers became available almost immediately.

In the past, we would restart the devices and complain about how unstable GCP seemed to be. Now I'm starting to wonder if this might be the root cause of that apparent instability. If the filter blocked even one keep-alive signal, it would make sense that it would knock things offline indefinitely.

So if you use GCP and some kind of server to control it (Google Cloud Print Service, PaperCut, uniFLOW, XPrintServer, etc.) you might want to exempt its traffic from your web filtering.

Sunday, March 12, 2017

G Suite and Social Security Numbers

A nearby school was hit with a spearphishing attack not long ago. As a result, their employee's personal information, including social security numbers, were stolen.

To protect my coworkers from a similar attack, I set up an email filter to catch messages with social security numbers in them. These messages are quarantined and reviewed by humans, who then visit the sender in person to review the situation. When I discussed this with my counterparts in other districts, they were very interested. So I decided to document the process here in case others could benefit.

At my job, we use G Suite for Education. It has a feature called "Content compliance" which uses regular expressions. So I went to admin.google.com, clicked on "Apps", clicked on "G Suite", and then clicked on "Gmail". From there, I clicked on "User Settings", selected the root OU, and scrolled down to "Content compliance".

In "Content compliance", I added a new rule. If you do this, make sure that rule affects outbound messages. I recommend also adding "Internal - sending" and "Internal - receiving", as well. This can help in the event of one coworker's account being compromised by a bad actor who then requests data from someone in Payroll. In my case, I enabled all three of those conditions. However, I didn't enable "Inbound". My thinking was that if the message already traveled across the Internet, it was already vulnerable and there was hardly a point. I recommend you consider your own case and make your own decision.

Then add the following regular expression (a.k.a. "regexp" or "regex") as a rule:

(^|\s)\d{3}-\d{2}-\d{4}(\s|[[:punct:]]|$)

In step three, I set the action to "Quarantine message". Then I saved the settings.

Lastly, I ran some tests. I made a test account and sent several messages to it. Those included the fake social security number of "123-45-6789" in the subject, the body, and in an Excel file attached to a message. In each case, as the administrator, I was sent a message telling me a new message was delivered to the quarantine with a link to take me there. I had the chance to review the message and reject it or approve it. If rejected, the message is sent back to the original sender with a vague message about it violating the recipient's content policy.

One final note: Don't forget the human factors.

If you decide to implement this, I strongly recommend discussing quarantined messages with their senders prior to rejecting or approving them. In my experience, people have responded quite well to this approach. I always explain the events at our neighboring district (without naming them), explain that I took steps to protect us, and finally explain that their message was caught in this filter. Even in cases where they were sending their own tax forms to another account they control, they were sympathetic to my intent. I was also respectful of their right to make their own decisions -- even if it put them at risk.

I think of it this way: If Mrs. Smith sent her student loan paperwork to herself, then I gave her my advice. She may choose to accept it (and I reject the message) or to accept the risk (and I approve the message.) That is her choice, as she is only putting herself at risk. In cases where someone is putting someone else at risk (e.g. Payroll sending out W-2 paperwork for employees), I speak to them and confirm that it is legitimate. If it is, I try to help them find a safer way to get their work done. By taking this approach, people generally react well and are appreciative.

Tuesday, February 7, 2017

Email Security Presentation

I recently had the opportunity to offer email security training to my coworkers. A few days later, our payroll clerk received a spear phishing message and realized it was a scam. She is quite sharp and probably would have spotted it anyway, but it got me thinking that others might not be so lucky.

I've modified my initial presentation for more general use. A number of details that I discussed verbally have been added to the slides and/or speaker notes. I am publishing this under a Creative Commons license so others can use it in their organizations. I recommend customizing it to suit your organization's needs before using it, but it should save a lot of time compared to building a presentation from scratch.

The one thing I ask in return is that you include a link back to this blog. Other than that, it is my earnest hope that you find this tool useful.

Options: Play in full screen | Make your own copy | License

Tuesday, December 20, 2016

GCRmanager, Part 2

If you run G Suite for Education (formerly Google Apps for Education), you probably use Google Classroom. If you read my article on the GCRmanager add-on for Google Sheets, then you know that you can pull data from G Suite about your school's usage of Google Classroom. Getting insight from that data can sometimes be challenging. So I decided I needed to write a follow-up to that article.

First, read my previous article. Once you have the data in Sheets and it finished filling in all the data, do this:

  1. Click on "Data" in the menu bar and then on "Pivot Table..."
  2. You'll be dropped into a new environment. On the bottom of the screen are tabs that you can use to flip between the full data you saw a moment ago and this new pivot table environment. For now, stay on the pivot table.
  3. On the right side, click on "Add field" next to "Rows" and select "OwnerEmail".
  4. On the right side, click on "Add field" next to "Columns" and select "courseState".
  5. On the right side, click on "Add field" next to "Values" and select "id". Set "Summarize by:" to "COUNTA".

At this point, you should have a list of teachers' email addresses. Next to each address, are three fields. The first is how many Classroom instances they created and haven't archived. This should be the number that they're actually using, but it is possible that they abandoned Classroom all together (and didn't clean up first) or that they're leaving old things active for their own reasons. The second field is the number that they've archived. The difference between these numbers is useful for seeing how they've shaped up over time. The third field is just the total of the first two.

If you want to "zoom in" on a school, there is a way to do that. On the right side, click on "Add field" next to "Filter" and select "OwnerEmail". Then click next to "Show:" to bring up a menu. Inside that menu, click on "Clear" to make the table show no one at all. Then click next to each name to put a check mark there and add them back to the table. This will allow you to see just the school, department, or team that you want to know about.

That is basically it. Pivot tables are a great tool once you learn how they work. They only work with certain kinds of data -- what is called "transactional data." Fortunately, that is exactly what GCRmanager makes. So feel free to tinker with the settings in order to see what you can do with it. There is probably a lot of interesting stuff you can figure out.

Tuesday, December 13, 2016

NTP Server Testing

If you run an NTP server, you should try this site. It is good for checking if your NTP server is available to your users when they're not on your internal network. It can also be helpful for running some security testing.

Tuesday, December 6, 2016

SSHguard & IPFW

It seems that SSHguard 1.7 dropped support for the "hosts.allow" file. Since I already wrote about how to setup SSHguard 1.6.x on FreeBSD using TCP Wrappers, I thought I should offer a quick update for SSHguard 1.7.x.

Please note that the process shown here assumes FreeBSD 10.x and SSHguard 1.7.x. The directions will go through five major steps: (1) Install SSHguard, (2) get SSHguard configured, (3) get IPFW started, (4) restart to bring it all together and make sure it works. Lastly, I'll cover (5) how to look at what is happening.

First, install SSHguard from the ports collection or upgrade it with portmaster, as needed. For example, to install it for the first time, you could:

su
cd /usr/ports/security/sshguard
make install

When prompted, select IPFW. To clean up unnecessary files, you can type "make clean", but this step is optional. If you already have it installed, check the FreeBSD Handbook for directions on using portsnap (section 4.5) and portmaster (section 4.5.3.1) to upgrade the port. Just be careful to avoid breaking any other ports in the process.

Once you have SSHguard 1.7.x installed, you'll need to configure it. Start by whitelisting any necessary IP addresses by adding them to the file "/usr/local/etc/sshguard.whitelist". Only add one IP address per line. I recommend preceding those lines with a comment to help you remember why you added them. Comments are lines that begin with a ”#”. So you might have something like this:

# Don't block the VPN server.
12.34.56.78

The last step in configuring SSHguard is to tell your system to run it at boot time. Do this by adding these lines to "/etc/rc.conf":

# Start SSHGuard
sshguard_enable="YES"

Now we should be ready to move on to the IPFW system. This replaces the much easier to manage TCP Wrappers system we used in SSHguard 1.6, a.k.a. the "/etc/hosts.allow" file. The first step is to enable the IPFW firewall at boot time by adding these lines to /etc/rc.conf:

firewall_enable="YES"
firewall_logging="YES"
firewall_type="open"

If you don't want to reboot the system, you can manually start the firewall by running "service ipfw start" as root. This is a great way to make sure that all your settings are right so far. However, don't do this unless you have physical access to the server. Changing firewall settings when you only have a network connection to the system is a quick way to get locked out of it by accident. The steps I've listed here won't do that, but I don't know what other changes you've made before reading this article, so I'm including this warning just in case.

Now that we have IPFW running, SSHguard will report suspicious activity to what IPFW calls "table 22." We need to tell IPFW to block everything listed in table 22. To do this, edit /etc/rc.local and add the following lines. If the file already exists, skip the first line and add the rest to the end of the file.

#!/bin/sh
echo Adding sshguard to IPFW settings
/sbin/ipfw -q add 55000 deny all from 'table(22)' to any

Next, allow the /etc/rc.local script to run during system startup. To do that, run this command as root:

chmod 0755 /etc/rc.local

Restart the system with "shutdown -r now" to confirm that this script runs properly at startup. Watch for it when the startup messages scroll by on console and also check the settings by logging in as root and typing "ipfw list".

That is basically it. I encourage you to review these steps and try to learn what they do and why they work that way. You'll probably find ways to adjust this process to fit your system a little better. However, this should get you started.

If you ever want to know what the IPFW firewall is doing, you can check its rules by running "ipfw list" as root.

If you want to see the SSHguard rules, specifically, you need to look at table 22. SSHguard keeps these rules isolated in their own table, so they don't accidentally overwrite anything else nor create any other unpredictable outcomes. To look at table 22, just run "ipfw table 22 list" as root.

Lastly, if you're setting up SSHguard for the first time, please read the end of my older article as well. It includes some advice that is still relevant. Also, remember that SSHguard should only a piece of your risk mitigation strategy. No single product or trick will ever cover you completely. Even if you're not an expert in Information Security, you should always strive for defense in depth as a way to reduce your risks.

Tuesday, November 29, 2016

Google Drive and a Second Chromebook

When you buy a Chromebook, it usually comes with a two year upgrade of an extra 100GB on your Google account. What I didn't know, was if you could use the promotion again after the two years ended.

For example, I signed up for a free preview of YouTube Red a while back. When the preview was over, I happened to have a Chromecast and there was a promotion for a free month of YouTube Red for Chromecast owners. Unfortunately, I couldn't sign up for that, because I was no longer considered a "new" subscriber.

In 2014, I received a chromebook that had a bonus 1TB upgrade for Google Drive for two years. I gave it a try and the two years ran out very recently. Before it ran out, I bought a new chromebook. I'll skip the story of why I did this. What matters is this: It also had a bonus 100GB on Google Drive for two years. So when my two years of the 1TB upgrade ran out, I went to the Chromebook Goodies website from the new chromebook to see if I could redeem the offer. At worst, it would only be for new users, like the YouTube Red promotion mentioned above.

Fortunately, I was able to redeem the offer. It seems that Google doesn't care if you're a new user or an existing one -- only that you bought a chromebook.

So if you're the kind of person who would pay $2 each month for the 100GB of extra storage, then this is like an extra $48 off the cost of the chromebook every two years. I've seen decent chromebooks for as little as $200, so this can be a significant fraction of the cost. Even some of the nicer chromebooks are in the $300-$400 range, which would make this a 12% - 16% discount.

Side note #1: Keep an eye open for a "security checkup" deal with Google in February. In February 2015 and 2016, they offered an extra 2GB of storage for anyone who did this. I did it both times and I now have 19GB of free space in my account, in addition to the 100GB promotion from my chromebook. (Yes, a total of 119GB of storage for things I was going to do anyway.) The security checkup was a series of questions that you should probably check on anyway, so I highly recommend doing this if they offer it again in February of 2017.

Side note #2: If you have an old G Suite account from when they were free (back when it was just called "Google Apps" and they gave you 100 free accounts), this promotion will work. I'm using it with my account, which I registered in 2008.

Tuesday, March 8, 2016

Graph Your Network Traffic

You need to graph your Internet usage, if not all network usage. I'm surprised I didn't write about this sooner. I talk about it frequently. It is one of the steps that separates a professional network or system administrator from someone just trying to keep things running. So let's dig into this.

Which discussion would you rather have when it's time to plan the budget:

A: "Things seem slow sometimes; especially during business hours. I believe that we should pay for a bigger Internet connection in order to address this."

...or...

B: "Here is a graph of our Internet usage over the last week. The dotted line across the top is what purchase from our ISP. The green line is our actual usage, with readings taken every 5 minutes. As you can see, our usage curves upward over the first hour that we're open and then hits the dotted line. Then we stay there until shortly after we close. Based on this data, I believe we should pay for a larger Internet connection."

I'm sure you can imagine other situations similar to these, but here are a few more: Justifying replacement of 100Mbps switches with 1000Mbps switches. Tracking down which device is flooding your network with poorly configured multicast traffic (rendering it useless for everyone else) in about 10 minutes. Figuring out if the lag you're experiencing is network congestion on your servers or a "full" Internet connection or if you just have too many devices on too few wireless access points.

These are all situations that you might really face. They're all situations that you can handle with aplomb if you set up network graphing. By looking at graphs of how much traffic is going through each switch in your network, you can quickly spot patterns that might otherwise be invisible.

If you don't know where to start, then I recommend checking out Cacti. By installing it on a server of your choice, you can start building graphs through a web app. For example, I started up my favorite free Unix-like system (FreeBSD) on a virtual server, installed Cacti quickly from the FreeBSD ports collection, added SNMP version 1 / read-only community names to all of my switches (easier than it sounds,) and started adding them to Cacti through a nice web-based interface. It was surprisingly easy, even though it took some time. I'd recount how to do it for you, but the reality is that other people on the Internet have already done a better job. Find a guide for your preferred server OS and give it a try.

The bottom line here is this: Even the most talented systems administrator doesn't know about the things they're not measuring. Make your systems measure themselves so you can make better decisions -- especially when speaking to your manager or anyone with the ability to shape the budget. If you're not sure where to start, try Cacti, because it's free, not overwhelmingly complex, and has enough ability that many professionals prefer it to the commercial products.

Tuesday, February 23, 2016

Data on Google Classroom Usage

Recently, I mentioned the GCRmanager add-on for Google Sheets to an online group and was surprised at how many people didn't know about it. So I thought I should share it here.

If you have Google Apps for Education (GAfE,) you have access to Google Classroom. It isn't as feature-filled as Moodle, Blackboard, Schoology, et. al. However, it is very effective.

I spent years trying to get teachers into using Moodle, for example. It offered so many options that the average teacher didn't know how to leverage it. It was like going to a restaurant and being given an 18 page menu. It can be daunting, especially now that teachers are overloaded with so much red tape.

When Google Classroom was released to all GAfE customers in summer 2014, it was amazingly simple and direct. I told my faculty, "It makes what you are already doing with Drive easier." And with that, it took off. We had lots of teachers trying to find ways to make life easier -- handing out worksheets, collecting essays, making announcements, and giving students a way to pick topics for the next assignment off a list.

The quirky thing was this: The same simplicity that made Classroom catch on with teachers also made it hard to get a "big picture" look at things. As the head of Information Technology and an adviser to school administration, I wanted to be able to say how many teachers used it recently, how many used it at all, and how many didn't even try. Fortunately, someone made GCRmanager.

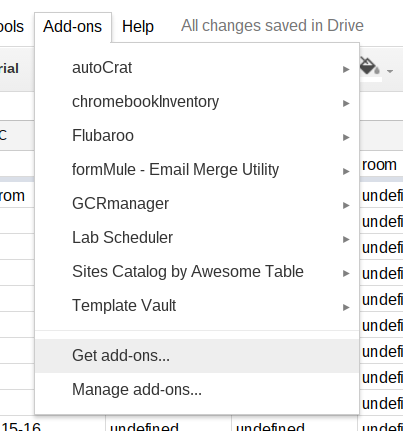
GCRmanager is an Add-on to Google Sheets. To get it, open a new file in Google Sheets. Then go to the menu bar, click on "Add-ons", and then "Get add-ons..." At this point, you'll be given an app-store-like experience that shows tools to extend Google Sheets. Search for "GCRmanager" and add it. Then close the Add-ons window. This adds "GCRmanager" to your Add-ons menu inside any and all Google Sheets files.

Since you're still in an empty Sheets file, now is the time to give GCRmanager a try.

Just click on "Add-ons", then "GCRmanager", then "List All Courses." This will take a while to finish. Possibly a long while. Give it time. When it is done, you'll have a line on the spreadsheet for every Google Classroom "class" that was created in your GAfE domain. It will include a lot of data you probably don't care about, like class ID# and owner ID#. It will also contain a lot of interesting information, such as the classes' owners, date created, date last updated, how many students are enrolled, if it is still active or archived, etc. Assuming that your faculty is using sensible class names, the name, section, descriptionHeading, description, and room columns could be useful, too.

At this point, you can keep the Sheets file for reference of Classroom usage at that point in time and make new files from time to time.

Tuesday, January 12, 2016

Packet capture on chromebooks

The excellent Stephen Gale shared a great tip recently on Google+.

In short, if you have a chromebook and were wishing for some packet capture software or other good network debugging tools, you just need to type "chrome://internals" into the address bar. There are also some great tools in Developer Mode, if you want to go that route. If you only want to know details about the current tab or page, you can go to the Developer Tools (which is different than Developer Mode, despite the similar names.)

Tuesday, January 5, 2016

Disable iCloud Login Prompt

In order to assist users in accessing Apple's online tools, MacOS prompts users to login to iCloud the first time that they login to a Mac. This can be very helpful for home users, but is largely in the way in multiuser environments, such as most schools. In corporate environments, it can even be against the data management policies (which safeguard the company against data leaks and break-in) or HIPAA or FERPA (depending on the institution.)

To disable the iCloud login prompt, just issue this command on each Mac as its local administrative account:


sudo defaults write /System/Library/User Template/Non_localized/Library/Preferences/com.apple.SetupAssistant DidSeeCloudSetup -bool TRUE

I do this via a shell script in Deploy Studio. In fact, I actually use a really nice script (see link below) with execution delayed until after first restart. This makes sure that the system is booted from the internal drive when the script is executed.

This could also be done by a scripting (or a postflight script in a PKG installer) delivered via Apple Remote Desktop (ARD), Munki, Casper, FileWave, etc. This technique would work well if you needed to implement this change on a set of Macs that were already in service.

If you use ARD, I recommend taking the additional step of adding the script to your setup process in Deploy Studio, Munki, etc. In the case of Munki, Casper, FileWave, etc. you're probably already in good shape. Just see if there is a way to schedule the script too execute early in the list of things to be installed. Otherwise, someone may login to the Mac before the script it loaded. For example, in FileWave you could set to activation date to be before any other filesets.

For a really good implementation of this idea, check out the script on this excellent post. The author does a great job of adjusting every existing user template and account on the Mac. So if you create local accounts (e.g. "student", "teacher", etc.) then this is a way to address that use-case as well. If you use Deploy Studio to image a Mac and CreateUserPKG to create accounts, just be sure to add this script to the workflow after the step with the user packages.

I like this script because it is very adaptable. Whether your accounts are on the local drive or a network system like Open Directory or Active Directory, the script takes it all into account. This reduces the chances of problems if/when you have to change your account management in the future.

Tuesday, October 20, 2015

SSHGuard

If you run any Unix-like systems, you probably know that the bad guys are trying to break into your server over SSH. You can use fail2ban or sshguard to greatly reduce the chances of a break-in. Below, I show how I setup sshguard on my FreeBSD servers. Its quick and relatively easy, so I consider it a requirement for all of my FreeBSD servers.

First, install sshguard from the ports collection:


cd /usr/ports/security/sshguard
make install

Next, tell FreeBSD to allow it to start by adding this line to /etc/rc.conf:


sshguard_enable="YES"

Then start it and stop it. This will create a configuration file that we'll use.


service sshguard start
service sshguard stop

Now the file /usr/local/etc/sshguard.whitelist should exist. Edit that and add any IP addresses that you might need to whitelist. For example, I whitelisted my network monitor. My reasoning was that it would test if the SSH service was still running every 60 seconds. So this would look like a break-in attempt and the monitor would be blocked after a few minutes.

You might also wish to whitelist certain other hosts, but I don't recommend whitelisting everything in your internal network. If someone did manage to break into your web server or some other system, they could then use "island hopping" to get to this host and break into it, too. So sshguard makes that harder on the attacker.

To add items to the whitelist, just add one IP address or FQDN per line. If you want to insert a comment, you can start the line with a "#" and then write your comment. I highly recommend putting a comment just above every entry. A few years from now, after an IP address is assigned to a different server, you might not remember why it is in your whitelist. Comments can help your future self save time.

Now just start the service back up with this:


service sshguard start

To confirm that it's running, try this:


service sshguard status

That is all it takes. If sshguard sees a suspicious attempt to login, it will add the IP address to the top of /etc/hosts.allow as a "deny" rule. It will take care of things all by itself from now on.

If you find that it blocked an IP by mistake, you can remove the block by just removing its IP from the hosts.allow file. Just be sure that you can really trust that IP. Maybe someone put a rootkit or bot on that host and sshguard is doing exactly what it should be doing. So be confident that its an error before removing the IP.

A few last notes: First, sshguard will log some data in /var/db/sshguard/blacklist.db. As far as I can tell, this is more or less just a log. I think sshguard uses it at startup time, but I'm not sure. If you need to remove the blacklisting from an IP, edit /etc/hosts.allow instead.

Second, there are a few different ways to setup sshguard. One of them involves piping data from syslog into sshguard. Others involve using PF or IPFW instead of hosts.allow. I haven't used those option and don't know the relative advantages and disadvantages of each method. What I've presented here is what works for me. Please feel free to research the options further and do what works for you. If you know why I should consider another method, please leave a comment on this article. I would truly appreciate the advice.

Lastly, don't forget that this is looking for persistent failed logins from a single IP. Advanced Persistent Threats can use botnets to try out one or two passwords from an IP and then one or two from another IP and so on. Patient attackers might also try one or two passwords every few hours until they guess right. People who know you or looked at the password list you keep under your keyboard are much less likely to be stopped by sshguard. The bottom line is simple: sshguard helps reduce risk but security is a mindset and not something any single product can give you. Be smart and be safe out there.

Monday, October 12, 2015

Software License Enforcement

So you manage a few hundred or maybe a few thousand computers. What do you do when it's time to buy software? If you buy too many copies, you wasted money. Too few copies means you're vulnerable to an expensive lawsuit. How do you ensure that you're in compliance and not wasting money?

I solved this problem about a decade ago and sometimes forget that others still face this challenge. If you're one of them, this article was written for you.

If you find yourself in this situation, I highly recommend having a conversation with the folks over at Sassafras Software about their K2 (a.k.a. KeyServer) product. I've been a happy customer for years.

Their customer support is knowledgeable, thorough, and friendly. I've never been on hold for more than 2 minutes or so. In fact, it is kind of like calling a buddy for advice -- no customer number to remember or case number to track. You just get through to them and start talking about your situation.

The product itself is great. You can install it on Windows or MacOS quite easily. I even did an automated install to hundreds of Macs via FileWave without problems. (This should work on Munki, Casper, etc. as well.) This customized installer is already configured with my KeyServer's address, so it connects as soon as it is installed. The computer then shows up in a list of monitored computers. As end users run programs, those programs are added to a list of "discovered" software. You can also add purchases, products, computers, and policies manually.

Here is a recent real-world example from my job. We purchased 500 installations of Microsoft Office 2016 for Mac. I told KeyServer that we had a new product and it checked in with Sassafras about what constituted "Office 2016" and set up some criteria for me. For example, if the user runs OneNote 2016, that computer is considered to have a license to Office 2016. So it is entitled to run Word, Excel, PowerPoint, and Outlook as well. Another computer might run Word 2008, but K2 knows that is a different version and doesn't count it as Office 2016.

Then I told it that we had purchased Office 2016 and filled out a form telling KeyServer it was 500 units of single-computer installations, that it was an original license and not an upgrade license, what it cost, my organization's purchase order number, that it didn't expire (i.e. that it wasn't a subscription,) etc. This is great data for tracking the licenses during a future audit. I could pull up a list of every time we purchased this product, how many "seats" we bought, which purchase orders to pull out as proof for the lawyers, and so on. It also helps calculate costs for supporting different products in the future. These kinds of hard numbers can help you make calculations and drive discussions about maintaining products in the future.

Lastly, and perhaps most importantly, KeyServer will let you choose how to monitor the license usage. It can passively track installations, track frequency of usage, or even enforce licensing. In the previous example, I configured it to allow the first 500 Macs to run Office 2016 to be automatically registered as users of it. After that, the 501st Mac to try to run that particular version of Office would receive a message saying that they weren't licensed to use it. So if someone was "helping out" and installed it when they shouldn't, that would turn up rather quickly. We could then choose to buy additional licenses or have a conversation about who really needs the software. If it turns out that one of the 500 to grab the license automatically shouldn't have it, we could withdraw that license and assign it to someone else. Next year, when computers are replaced, I can move the licenses around. A few years later, when the next version of Office is released, I could run a report to see how many computers actually used the software and factor that into future buying decisions.

There are a lot of features and situations that I didn't cover in this example. My point was just to show how K2 can make many common situations much easier. Given what we pay on it compared to the manpower (and the salary) wasted on walking around doing manual audits, I think K2 is a huge time and money saver. It saves even more time and money if you use the utilization reports to find licenses to move around or drive budgeting of upgrades.

If you manage a few hundred Windows PCs or Macs, I highly recommend a look into what Sassafras Software could do to help you.