Tuesday, March 30, 2021

Clearing User Files on Macs

In some environments, it is desirable to clear all the user created and downloaded content from a Mac when the user logs out. Perhaps there is only one generic account or you're trying to strongly encourage users to only store things on servers or online services like Google Drive. To create this effect in my environment, I wrote a LaunchAgent and a configurable shell script. I've tested this up to MacOS 10.12, a.k.a. Sierra, but it will probably work on newer versions as well.

To start, the "engine" of this system is the following shell script. Place the code in the file /usr/local/bin/clear_local_files.sh and make it executable. You might need to make this directory manually. You can do that with mkdir -p /usr/local/bin && chmod 755 /usr/local/bin. When you finish pasting the following code into your preferred text editor (BBEdit is a great option), you can save the file clear_local_files.sh to that location. Then use chmod +x /usr/local/bin/clear_local_files.sh to make it executable.


#!/bin/sh
#
# This script will clear away a lot of the files that users are likely
# to leave behind on the local disk.  This is meant as a way to encourage
# users to store files on the server, so that they aren't accidentally
# lost when a computer breaks down, is replaced, is upgraded, etc.
#

# The following is a list of directories at the root of the user's home
#   which will be cleared.
# Note:  The lack of Library allows account customizations to stay on the
#   local disk.
# Note:  Some sub-items will be moved back in a following setting.
# Warning:  Never put " in " in this list, as it will cause a syntax
#   error with loops.
clearDirs=( "Desktop" "Documents" "Downloads" "Movies" "Music" "Pictures" "Public" "Sites" )

# The following is a list of items to preserve in the user's home.
# Warning:  Never put " in " in this list, as it will cause a syntax
#   error with loops.
# Warning:  Be careful with spaces, colons, and slashes in file names.
keepDirs=( "Documents/Microsoft User Data" "Movies/iMovie data folders" "Movies/iMovie Events.localized" "Movies/iMovie Projects" "Movies/iMovie Library.imovielibrary" "Movies/iMovie Theater.theater" "Music/iTunes" "Pictures/iPhoto Library.photolibrary" "Pictures/Photos Library.photoslibrary" "Public/Drop Box" "Sites/images" "Sites/index.html" "Sites/Streaming" )

# This should be executed in the home directory of the current user.
cd ~

# Make a place to hide things.
mkdir ~/.backup0

# Move things into that hidden location
for item in "${clearDirs[@]}"
do
        if [ -e "${item}" ];
        then
                mkdir -p .backup0/"${item}"
                mv "${item}"/* .backup0/"${item}"/
        fi
done
        
# Move the things we're preserving out of the hidden location and back where they're supposed to be.
for item in "${keepDirs[@]}"
do
        if [ -e ".backup0/${item}" ];
        then
                mv ".backup0/${item}" "${item}"
        fi
done

# Get rid of anything that has been around too long.
if [ -e ~/.backup9 ];
then
        rm -rf ~/.backup9
fi

# "Age" each hidden backup by one "notch"
for index in {8..0}
do
        # Make sure it exists before moving it, to avoid errors.
        if [ -e ~/.backup${index} ];
        then
                index2=`expr "$index" + 1`
                mv ~/.backup${index} ~/.backup${index2}
        fi
done


exit

The next step is to make this run whenever a user logs out. However, it is easier to make this run at login than logout. A small difference and mostly unnoticable to the end user, so this is what I went with. To do this, I made a LaunchAgent by putting the following code into a file named com.reviewmynotes.clearLocalFiles.plist located at /Library/LaunchAgents.


<plist version="1.0">
<dict>
        <key>KeepAlive</key>
        <false>

        <key>Label</key>
        <string>org.cairodurham.clearLocalFiles</string>

        <key>LowPriorityIO</key>
        <true>

        <key>ProgramArguments</key>
        <array>
                <string>/usr/local/bin/clear_local_files.sh</string>
        </array>

        <key>RunAtLoad</key>
        <true>

        <key>LimitLoadToSessionType</key>
        <array>
                <string>Aqua</string>
        </array>

</true></true></false></dict>
</plist>

Now logout and login. Anything in the locations listed in clearDirs and not listed in keepDirs should be moved into a hidden folder called .backup1. At each login, that folder will be renamed so the number goes up by one. The folder .backup9 will be deleted each time. This gives you a chance to save people from their own mistakes.

This system can be easily deployed via tools like Munki, Jamf, and FileWave.

Wednesday, February 19, 2020

G Suite Walled Garden for Email

If you're using email in a school, one thing you should consider is blocking outside email messages sent to your students. If you're in the United States, then COPPA applies to any students under 13 years old. For most areas, this means all elementary and middle/junior high school students. Some may think that this should apply to all students. That is a decision for your district leadership team.

This goal is very achievable if you use G Suite.

First, arrange students into OUs by school, grade, and/or year of graduation. Personally, I recommend a nested approach. I place student accounts into an OU for their year of graduation. This is easily changed for the small number of students who are retained each year. Then I place these OUs into OUs for their grade. This means that I can quickly move all students to their new grade. Any grade-level configurations go onto the grade's OU, not the OU for the class-of-####. This reduces the effort when students are promoted to the next grade each year. If your district only has one school for each grade (i.e. only one elementary school, one middle school, and one high school), then you can nest the grades' OUs inside OUs for each school, too. This allows a quick way to apply settings across all grades in a school.

If you don't have students cleanly arranged into OUs yet, you may want to consider using either GAM or Gopher for Users to do this efficiently. When coupled with exports from G Suite and your student information system, these can be very effective tools. I recommend GAM for those with no budget and/or lots of experience with the Linux command line and Gopher for Users for anyone more comfortable with a spreadsheet environment.

Now that you have the ability to "aim" settings at the relevant groupings of student accounts, login to http://admin.google.com and go to Apps, then G Suite, then Gmail, then Advanced Settings. Select the OU to restrict on the left side. Scroll down to "Restrict delivery" under the "Compliance" header.

Hover the pointer over that line and the "Edit" button will appear on the far right. Click on that. New settings will appear. In this space, create a list of whitelisted domains. I called mine "Walled Garden". This list should start small and may have a few things added over time. Add your own domain here, as a precaution. Some websites used with students may require registering for accounts over email. You'll have to add those, too.

This may be obvious, but never add "gmail.com" or "yahoo.com" or other free email services to this list. If you do, it will defeat the purpose of this restriction. That said, I did end up adding "google.com" (not "gmail.com") so that students could receive notices of shared files from Google Drive.

You'll also want to add a rejection notice for email that isn't delivered. This goes in step #2 in the above screenshot. You should also check the box to allow bypassing this restriction for internal messages. Note that this applies for Gmail-to-Gmail messages, but you may have external products that technically aren't "internal," such as copiers that scan-and-email documents. This is why your domain should be in the list in step #1. When done, save your new settings. Then duplicate them for any other OUs that should have them. For easier management, I recommend re-using the same whitelist in each OU. For example, you could apply the settings to "Elementary School" and "Middle School", but use the same "Wall Garden" whitelist for each of them.

These settings now apply to both incoming and outgoing email which involve domains not on your whitelist. Note that external users (e.g. "person@yahoo.com") would receive the customized message from step #2 while internal users (i.e. your users) sending out would simply receive an "undeliverable" notice.

Tuesday, January 8, 2019

Download MacOS 10.12 (a.k.a. Sierra)

Sometimes a systems administrator needs to get specific OS installers, due to compatibility issues. MacOS 10.13 (a.k.a. "High Sierra") introduced a new file system called APFS. Apple also started making firmware updates part of OS updates. These changes can cause significant issues with using imaging tools like Deploy Studio.

Thankfully, the excellent MacOS systems administration blog Krypted.com published a way to download the version right before that. So if you need to set up imaging of Macs, this is the last version you can reliably use.

Use it for now, but start planning a new workflow to maintain your Macs; one that doesn't involve imaging. That isn't supported by Apple any more. For details on that particular challenge, look for presentations by Greg Neagle at the MacSysAdmin conference, such as this one.

Note: If Krypted.com isn't available for some reason, the recommendation was simply to use this link.

Update: If you need a different version, Krypted.com has a newer article that covers a number of other versions.

Thursday, January 18, 2018

Exporting User List from Active Directory

Sometimes you just need a simple file with a list of users in it.

In my case, I've made various programs to streamline and automate the work of my department. We "feed" one of these programs user data from Active Directory and elsewhere so it can make and delete accounts when students transfer in or out of the district.

You may not have a custom system like that, but there are many other reasons to be able to export data from Active Directory into a spreadsheet or text listing. One example would be turning over a list of users to the payroll department, so they can tell you what accounts should have been closed but slipped through the cracks. (Side note: I actually recommend doing at least annually and preferably every three to six months.)

To make such a list, login to a Domain Controller for your Active Directory system as a Domain Admin, run the command line, and use a command like this:


csvde -f ad.txt -n -d "ou=students,ou=People,dc=controller,dc=example,dc=com" -r "(&(objectCategory=person)(objectClass=user))" -l "sAMAccountName,givenName,sn,description"

That was probably too long to fit on the page, so let's break it down.

  • csvde:
    This will make a file in the current directory (a.k.a. folder.) That file is in the CSV format. To remember this command, think of it as as "CSV Data Export."
  • -f ad.txt:
    This file will be named "ad.txt".
  • -n:
    Any binary data is excluded.
  • -d "ou=students,ou=People,dc=controller,dc=example,dc=com"
    It will limit itself to data in the Organizational Unit (OU) named "students", which is inside "People", and in the Active Directory system at controller.example.com.
  • -r "(&(objectCategory=person)(objectClass=user))":
    It will limit the export to only user accounts. For example, if there are computers or groups in that OU, those will not be exported.
  • -l "sAMAccountName,givenName,sn,description":
    Its columns will be the username, the first name, the last name, and the description. Note that the first name is labeled "givenName" and the last name is labeled "sn" as in "surname."

If you want to change the OU, just adjust the part after the -d to include your OU and DC structure. If you want to change the data in the export file, just change the part after the -l. To learn more details, check out Microsoft's article on the csvde command.

If you adjust this to suit your environment, you should be able to generate CSV files that list your users very quickly. At my job, we can export over 1,000 users in under a minute. The CSV file can be read by scripts we write or imported into a Google Sheet and shared with Payroll for a quick account audit.

Wednesday, May 24, 2017

Google Cloud Print and Web Filters

At work, I have three LANTronix XPrintServer systems to make printers available to our chromebooks -- one for each school's printers. Recently, two schools' printers were listed as "Offline" and one wasn't. I eventually realized that my web filter was interfering with the keep-alive traffic between the devices and Google. The working system was already exempted in the web filter, so I added the other two and their printers became available almost immediately.

In the past, we would restart the devices and complain about how unstable GCP seemed to be. Now I'm starting to wonder if this might be the root cause of that apparent instability. If the filter blocked even one keep-alive signal, it would make sense that it would knock things offline indefinitely.

So if you use GCP and some kind of server to control it (Google Cloud Print Service, PaperCut, uniFLOW, XPrintServer, etc.) you might want to exempt its traffic from your web filtering.

Sunday, March 12, 2017

G Suite and Social Security Numbers

A nearby school was hit with a spearphishing attack not long ago. As a result, their employee's personal information, including social security numbers, were stolen.

To protect my coworkers from a similar attack, I set up an email filter to catch messages with social security numbers in them. These messages are quarantined and reviewed by humans, who then visit the sender in person to review the situation. When I discussed this with my counterparts in other districts, they were very interested. So I decided to document the process here in case others could benefit.

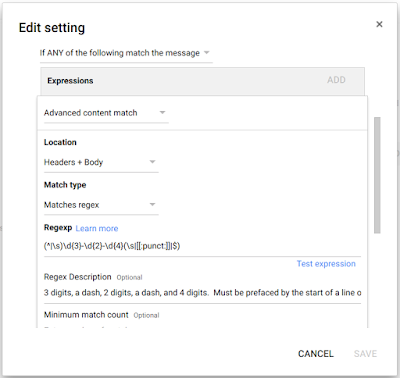
At my job, we use G Suite for Education. It has a feature called "Content compliance" which uses regular expressions. So I went to admin.google.com, clicked on "Apps", clicked on "G Suite", and then clicked on "Gmail". From there, I clicked on "User Settings", selected the root OU, and scrolled down to "Content compliance".

In "Content compliance", I added a new rule. If you do this, make sure that rule affects outbound messages. I recommend also adding "Internal - sending" and "Internal - receiving", as well. This can help in the event of one coworker's account being compromised by a bad actor who then requests data from someone in Payroll. In my case, I enabled all three of those conditions. However, I didn't enable "Inbound". My thinking was that if the message already traveled across the Internet, it was already vulnerable and there was hardly a point. I recommend you consider your own case and make your own decision.

Then add the following regular expression (a.k.a. "regexp" or "regex") as a rule:

(^|\s)\d{3}-\d{2}-\d{4}(\s|[[:punct:]]|$)

In step three, I set the action to "Quarantine message". Then I saved the settings.

Lastly, I ran some tests. I made a test account and sent several messages to it. Those included the fake social security number of "123-45-6789" in the subject, the body, and in an Excel file attached to a message. In each case, as the administrator, I was sent a message telling me a new message was delivered to the quarantine with a link to take me there. I had the chance to review the message and reject it or approve it. If rejected, the message is sent back to the original sender with a vague message about it violating the recipient's content policy.

One final note: Don't forget the human factors.

If you decide to implement this, I strongly recommend discussing quarantined messages with their senders prior to rejecting or approving them. In my experience, people have responded quite well to this approach. I always explain the events at our neighboring district (without naming them), explain that I took steps to protect us, and finally explain that their message was caught in this filter. Even in cases where they were sending their own tax forms to another account they control, they were sympathetic to my intent. I was also respectful of their right to make their own decisions -- even if it put them at risk.

I think of it this way: If Mrs. Smith sent her student loan paperwork to herself, then I gave her my advice. She may choose to accept it (and I reject the message) or to accept the risk (and I approve the message.) That is her choice, as she is only putting herself at risk. In cases where someone is putting someone else at risk (e.g. Payroll sending out W-2 paperwork for employees), I speak to them and confirm that it is legitimate. If it is, I try to help them find a safer way to get their work done. By taking this approach, people generally react well and are appreciative.

Tuesday, February 7, 2017

Email Security Presentation

I recently had the opportunity to offer email security training to my coworkers. A few days later, our payroll clerk received a spear phishing message and realized it was a scam. She is quite sharp and probably would have spotted it anyway, but it got me thinking that others might not be so lucky.

I've modified my initial presentation for more general use. A number of details that I discussed verbally have been added to the slides and/or speaker notes. I am publishing this under a Creative Commons license so others can use it in their organizations. I recommend customizing it to suit your organization's needs before using it, but it should save a lot of time compared to building a presentation from scratch.

The one thing I ask in return is that you include a link back to this blog. Other than that, it is my earnest hope that you find this tool useful.

Options: Play in full screen | Make your own copy | License