Tuesday, February 23, 2016

Data on Google Classroom Usage

Recently, I mentioned the GCRmanager add-on for Google Sheets to an online group and was surprised at how many people didn't know about it. So I thought I should share it here.

If you have Google Apps for Education (GAfE,) you have access to Google Classroom. It isn't as feature-filled as Moodle, Blackboard, Schoology, et. al. However, it is very effective.

I spent years trying to get teachers into using Moodle, for example. It offered so many options that the average teacher didn't know how to leverage it. It was like going to a restaurant and being given an 18 page menu. It can be daunting, especially now that teachers are overloaded with so much red tape.

When Google Classroom was released to all GAfE customers in summer 2014, it was amazingly simple and direct. I told my faculty, "It makes what you are already doing with Drive easier." And with that, it took off. We had lots of teachers trying to find ways to make life easier -- handing out worksheets, collecting essays, making announcements, and giving students a way to pick topics for the next assignment off a list.

The quirky thing was this: The same simplicity that made Classroom catch on with teachers also made it hard to get a "big picture" look at things. As the head of Information Technology and an adviser to school administration, I wanted to be able to say how many teachers used it recently, how many used it at all, and how many didn't even try. Fortunately, someone made GCRmanager.
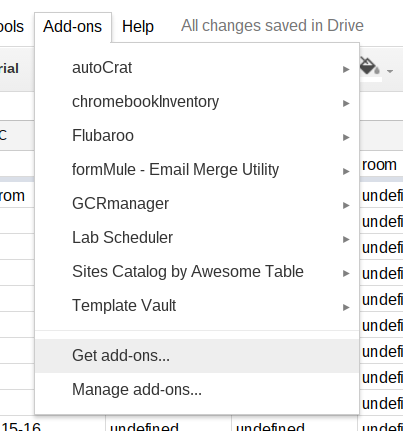
GCRmanager is an Add-on to Google Sheets. To get it, open a new file in Google Sheets. Then go to the menu bar, click on "Add-ons", and then "Get add-ons..." At this point, you'll be given an app-store-like experience that shows tools to extend Google Sheets. Search for "GCRmanager" and add it. Then close the Add-ons window. This adds "GCRmanager" to your Add-ons menu inside any and all Google Sheets files.

Since you're still in an empty Sheets file, now is the time to give GCRmanager a try.

Just click on "Add-ons", then "GCRmanager", then "List All Courses." This will take a while to finish. Possibly a long while. Give it time. When it is done, you'll have a line on the spreadsheet for every Google Classroom "class" that was created in your GAfE domain. It will include a lot of data you probably don't care about, like class ID# and owner ID#. It will also contain a lot of interesting information, such as the classes' owners, date created, date last updated, how many students are enrolled, if it is still active or archived, etc. Assuming that your faculty is using sensible class names, the name, section, descriptionHeading, description, and room columns could be useful, too.

At this point, you can keep the Sheets file for reference of Classroom usage at that point in time and make new files from time to time.

Tuesday, January 12, 2016

Packet capture on chromebooks

The excellent Stephen Gale shared a great tip recently on Google+.

In short, if you have a chromebook and were wishing for some packet capture software or other good network debugging tools, you just need to type "chrome://internals" into the address bar. There are also some great tools in Developer Mode, if you want to go that route. If you only want to know details about the current tab or page, you can go to the Developer Tools (which is different than Developer Mode, despite the similar names.)

Tuesday, January 5, 2016

Disable iCloud Login Prompt

In order to assist users in accessing Apple's online tools, MacOS prompts users to login to iCloud the first time that they login to a Mac. This can be very helpful for home users, but is largely in the way in multiuser environments, such as most schools. In corporate environments, it can even be against the data management policies (which safeguard the company against data leaks and break-in) or HIPAA or FERPA (depending on the institution.)

To disable the iCloud login prompt, just issue this command on each Mac as its local administrative account:


sudo defaults write /System/Library/User Template/Non_localized/Library/Preferences/com.apple.SetupAssistant DidSeeCloudSetup -bool TRUE

I do this via a shell script in Deploy Studio. In fact, I actually use a really nice script (see link below) with execution delayed until after first restart. This makes sure that the system is booted from the internal drive when the script is executed.

This could also be done by a scripting (or a postflight script in a PKG installer) delivered via Apple Remote Desktop (ARD), Munki, Casper, FileWave, etc. This technique would work well if you needed to implement this change on a set of Macs that were already in service.

If you use ARD, I recommend taking the additional step of adding the script to your setup process in Deploy Studio, Munki, etc. In the case of Munki, Casper, FileWave, etc. you're probably already in good shape. Just see if there is a way to schedule the script too execute early in the list of things to be installed. Otherwise, someone may login to the Mac before the script it loaded. For example, in FileWave you could set to activation date to be before any other filesets.

For a really good implementation of this idea, check out the script on this excellent post. The author does a great job of adjusting every existing user template and account on the Mac. So if you create local accounts (e.g. "student", "teacher", etc.) then this is a way to address that use-case as well. If you use Deploy Studio to image a Mac and CreateUserPKG to create accounts, just be sure to add this script to the workflow after the step with the user packages.

I like this script because it is very adaptable. Whether your accounts are on the local drive or a network system like Open Directory or Active Directory, the script takes it all into account. This reduces the chances of problems if/when you have to change your account management in the future.

Tuesday, October 20, 2015

SSHGuard

If you run any Unix-like systems, you probably know that the bad guys are trying to break into your server over SSH. You can use fail2ban or sshguard to greatly reduce the chances of a break-in. Below, I show how I setup sshguard on my FreeBSD servers. Its quick and relatively easy, so I consider it a requirement for all of my FreeBSD servers.

First, install sshguard from the ports collection:


cd /usr/ports/security/sshguard
make install

Next, tell FreeBSD to allow it to start by adding this line to /etc/rc.conf:


sshguard_enable="YES"

Then start it and stop it. This will create a configuration file that we'll use.


service sshguard start
service sshguard stop

Now the file /usr/local/etc/sshguard.whitelist should exist. Edit that and add any IP addresses that you might need to whitelist. For example, I whitelisted my network monitor. My reasoning was that it would test if the SSH service was still running every 60 seconds. So this would look like a break-in attempt and the monitor would be blocked after a few minutes.

You might also wish to whitelist certain other hosts, but I don't recommend whitelisting everything in your internal network. If someone did manage to break into your web server or some other system, they could then use "island hopping" to get to this host and break into it, too. So sshguard makes that harder on the attacker.

To add items to the whitelist, just add one IP address or FQDN per line. If you want to insert a comment, you can start the line with a "#" and then write your comment. I highly recommend putting a comment just above every entry. A few years from now, after an IP address is assigned to a different server, you might not remember why it is in your whitelist. Comments can help your future self save time.

Now just start the service back up with this:


service sshguard start

To confirm that it's running, try this:


service sshguard status

That is all it takes. If sshguard sees a suspicious attempt to login, it will add the IP address to the top of /etc/hosts.allow as a "deny" rule. It will take care of things all by itself from now on.

If you find that it blocked an IP by mistake, you can remove the block by just removing its IP from the hosts.allow file. Just be sure that you can really trust that IP. Maybe someone put a rootkit or bot on that host and sshguard is doing exactly what it should be doing. So be confident that its an error before removing the IP.

A few last notes: First, sshguard will log some data in /var/db/sshguard/blacklist.db. As far as I can tell, this is more or less just a log. I think sshguard uses it at startup time, but I'm not sure. If you need to remove the blacklisting from an IP, edit /etc/hosts.allow instead.

Second, there are a few different ways to setup sshguard. One of them involves piping data from syslog into sshguard. Others involve using PF or IPFW instead of hosts.allow. I haven't used those option and don't know the relative advantages and disadvantages of each method. What I've presented here is what works for me. Please feel free to research the options further and do what works for you. If you know why I should consider another method, please leave a comment on this article. I would truly appreciate the advice.

Lastly, don't forget that this is looking for persistent failed logins from a single IP. Advanced Persistent Threats can use botnets to try out one or two passwords from an IP and then one or two from another IP and so on. Patient attackers might also try one or two passwords every few hours until they guess right. People who know you or looked at the password list you keep under your keyboard are much less likely to be stopped by sshguard. The bottom line is simple: sshguard helps reduce risk but security is a mindset and not something any single product can give you. Be smart and be safe out there.

Monday, October 12, 2015

Software License Enforcement

So you manage a few hundred or maybe a few thousand computers. What do you do when it's time to buy software? If you buy too many copies, you wasted money. Too few copies means you're vulnerable to an expensive lawsuit. How do you ensure that you're in compliance and not wasting money?

I solved this problem about a decade ago and sometimes forget that others still face this challenge. If you're one of them, this article was written for you.

If you find yourself in this situation, I highly recommend having a conversation with the folks over at Sassafras Software about their K2 (a.k.a. KeyServer) product. I've been a happy customer for years.

Their customer support is knowledgeable, thorough, and friendly. I've never been on hold for more than 2 minutes or so. In fact, it is kind of like calling a buddy for advice -- no customer number to remember or case number to track. You just get through to them and start talking about your situation.

The product itself is great. You can install it on Windows or MacOS quite easily. I even did an automated install to hundreds of Macs via FileWave without problems. (This should work on Munki, Casper, etc. as well.) This customized installer is already configured with my KeyServer's address, so it connects as soon as it is installed. The computer then shows up in a list of monitored computers. As end users run programs, those programs are added to a list of "discovered" software. You can also add purchases, products, computers, and policies manually.

Here is a recent real-world example from my job. We purchased 500 installations of Microsoft Office 2016 for Mac. I told KeyServer that we had a new product and it checked in with Sassafras about what constituted "Office 2016" and set up some criteria for me. For example, if the user runs OneNote 2016, that computer is considered to have a license to Office 2016. So it is entitled to run Word, Excel, PowerPoint, and Outlook as well. Another computer might run Word 2008, but K2 knows that is a different version and doesn't count it as Office 2016.

Then I told it that we had purchased Office 2016 and filled out a form telling KeyServer it was 500 units of single-computer installations, that it was an original license and not an upgrade license, what it cost, my organization's purchase order number, that it didn't expire (i.e. that it wasn't a subscription,) etc. This is great data for tracking the licenses during a future audit. I could pull up a list of every time we purchased this product, how many "seats" we bought, which purchase orders to pull out as proof for the lawyers, and so on. It also helps calculate costs for supporting different products in the future. These kinds of hard numbers can help you make calculations and drive discussions about maintaining products in the future.

Lastly, and perhaps most importantly, KeyServer will let you choose how to monitor the license usage. It can passively track installations, track frequency of usage, or even enforce licensing. In the previous example, I configured it to allow the first 500 Macs to run Office 2016 to be automatically registered as users of it. After that, the 501st Mac to try to run that particular version of Office would receive a message saying that they weren't licensed to use it. So if someone was "helping out" and installed it when they shouldn't, that would turn up rather quickly. We could then choose to buy additional licenses or have a conversation about who really needs the software. If it turns out that one of the 500 to grab the license automatically shouldn't have it, we could withdraw that license and assign it to someone else. Next year, when computers are replaced, I can move the licenses around. A few years later, when the next version of Office is released, I could run a report to see how many computers actually used the software and factor that into future buying decisions.

There are a lot of features and situations that I didn't cover in this example. My point was just to show how K2 can make many common situations much easier. Given what we pay on it compared to the manpower (and the salary) wasted on walking around doing manual audits, I think K2 is a huge time and money saver. It saves even more time and money if you use the utilization reports to find licenses to move around or drive budgeting of upgrades.

If you manage a few hundred Windows PCs or Macs, I highly recommend a look into what Sassafras Software could do to help you.

Saturday, September 12, 2015

SFTP Connections from PowerSchool

At my job, we store student data in a program called PowerSchool. One of PowerSchool's features is AutoSend. AutoSend can make a text file full of data and send it to another computer over SFTP. This is very useful, as it allows student data to be entered once (in PowerSchool) but appear in many systems.

Recently, I replaced and updated the FreeBSD system that runs our SFTP server. After the upgrade, PowerSchool couldn't send data to the FreeBSD SFTP server. Other SFTP programs, such as FileZilla, were able. This issue only seemed to affect PowerSchool's AutoSend. I couldn't figure it out at first. The FreeBSD community couldn't. Our tech support couldn't. They escalated the issue over and over until it reached "engineering" and I never heard back from engineering.

After working on this on-and-off through the summer and eventually found a way to make it work. Since it took me so long and confused so many other people, I wanted to put this out there for others to benefit.

The short version is this: I had to change the default settings of the SSH server.

This may sound strange to some, but SFTP on many Unix systems -- such as FreeBSD and Linux -- is based on OpenSSH. OpenSSH is a system that is all about making encrypted connections and preventing the bad guys from seeing what you're transmitting. However, its default settings moved to a more strict standard at some point and this was why I saw a difference between the old FreeBSD server and the new one.

The setting in question deals with how OpenSSH handles authentication. In plainer language, it's all about the login process. It seems that "keyboard-interactive" is the mode used by programs that interact with humans, such as FileZilla. However, "password authentication" is the kind used by automated systems, such as PowerSchool. Personally, I found the name "password authentication" to be confusing for a while, but that is what it is called.

So I edited /etc/ssh/sshd_config to allow the password authentication system. However, the OpenSSH developers disabled it for a reason. They know more about computer security than I do, so I struck a compromise. I changed the settings so that password authentication was valid if and only if the connection came from my PowerSchool server.

If you need to do this, just find your system's copy of sshd_config and add the following lines to the bottom of the file. If you have any lines beginning with "Match", this should go immediately above those.


# Turn off PasswordAuthentication in general, i.e. without a Match statement to change it.
PasswordAuthentication no
# Allow only the IP address of the PowerSchool server to use the
# PasswordAuthentication directive. Note the "PasswordAuthentication no" 
# above all Match statements.  That is part of this configuration, but 
# must be before any Match blocks.
Match Address 999.999.999.999/32
        PasswordAuthentication yes

You should change "999.999.999.999" to the IP address of your PowerSchool server. Everything else should be fine exactly as I wrote it above.

Tuesday, June 30, 2015

Free Chromebook Inventory Tool

If you manage chromebooks (or other ChromeOS devices) in a Google Apps for Education or Google Apps for Work system, you need this tool.

The Chromebook Inventory Add-On for Google Sheets allows you to quickly make a spreasheet of your managed chromebooks. You can then edits the spreadsheet and export it back to the Google servers. When the export is done, it will update those settings. This makes it a convenient tool to do bulk updates, move large numbers of chromebooks to a new OU, make inventory files, or make checklists.

I couldn't explain this system any better than the seven minute long video that they provide. So just check that out.