Chromebooks are a marvel of low maintenance. They require almost no effort to get running or keep running and have all kinds of advantages. However, logging into them can be a challenge for the youngest of students. Typing a username like "john.doe@myschoolname.org" is a bit much for a kindergarten student. It can even pose a challenge up to 2nd grade.
In this article, I want to show two solutions that I came up with. My teachers were extremely grateful when I rolled out the first one in 2013. Since rolling out the second in 2014, they've barely stopped thanking me. Both approaches are free and only require that your chromebooks are enrolled in a Google Apps For Education domain -- a very common thing.
First StepsFirst, you have to identify which chromebooks will be effected by this setup. In my case, there were two carts of chromebooks used by kindergarten through second grade. This was the obvious choice for me, since we start teaching students to login with their own accounts a few months into second grade. I was fortunate, because K-2 are the only grades using these two carts and they only use these carts.
Once you've identified the chromebooks you want to effect, go to admin.google.com and create an organizational unit (OU) to isolate them. OUs can be hierarchical, so feel free to arrange things however you need. In my case, I made an OU called "Devices", then sub-OU called "Schools" and "Digital Signage" and "Special Cases" and so forth. Within "Schools", I made a sub-OU for each school and then a sub-OU for each cart of chromebooks.
It took a bit of time to do this and then file each chromebook into its relevant OU, but it pays off in the long run. There are a lot of time when applying a setting to just one lab or just one school is exactly what you want to do. This groundwork makes that possible.
One last point before I move on: Talk to your stakeholders. Sometimes the teachers are aware of things that the technical support folk aren't. Don't get into too many technical details, but ask them about their computer use patterns. The right OU structures should become obvious once you do this.
Guest LoginNow that you've laid a good foundation, then next step is pretty easy.
In the Google Apps For Education (GAFE) controls located at admin.google.com, go to "Device management" then "Settings". On the left side, select the first OU that you want to effect. Then go to "Guest Mode" and change it to "Allow guest mode". Click "Save changes" at the bottom. Repeat this for each OU that you want to change.

After the next reboot, the chromebooks' login window should have changed. If you had the kind of login window that has two blank text fields for name and password, it will now have a bit of blue text on the right side. It says "Browse as Guest". If you previously had the kind of login window that shows icons of each user, then you'll have a "Browse as Guest" button on the lower-left corner.
Either way, the effect is the same. A student clicking on Browse as Guest will be sent to an Incognito window. This means they don't have to remember a password and they don't have to type a long (for a 5 year old) email address. However, this also means that you can't look up their browsing history nor can you know who used the chromebook last. So there are trade-offs. However, for the very young students these trade-offs can be very worthwhile.
If you'd like, you can stop here. Show your teachers this new option and you're all done. Its a huge improvement and they'll probably be grateful for it. However, if you want to take this to the next level, keep reading.
Next StepsMy teachers used Browse as Guest happily for a year. They eventually started telling me that having students type in "www.example.com" took a long time. Students didn't know where the letters were on the keyboard and didn't know how to spell things. This was in the back of my mind on the day I discovered Public Sessions. I realized that we could much go further.
Using Public Sessions, I could make a chromebook as easy to use as a tablet. I can't understate this. This is huge.
One of the reasons that teachers in the early grades like tablets is that they are a big screen full of buttons. The student presses the button for the service they want and then they get it. No login window. No typing URLs. Its just there. And the teacher can customize and streamline the experience.
Using a mix of Google Sites and Public Sessions, chromebooks can have this advantage, too. If you have touch-screen chromebooks, then you've basically made a low cost, low maintenance tablet with a keyboard.
Get FeedbackFirst, ask your target teachers what sites they use regularly. These are the URLs that teachers have been typing into the chromebooks for the students. These are the sites that you're going to make easy to access.
Once you have that list compiled, send it to them. Ask if anything was missed.
Now look for a pattern. Does each grade level have its own list? Would it be best to arrange them by subject? The purpose here is to figure out how you want to arrange the icons on the screen.
Google SiteNext, make a Google Site using logos for each service. Arrange the logos in a way that makes sense to you. Don't over think it. Just get them on the page. Then email the URL to your new site to your teachers. Ask what they think. Say something like, "I'm looking at a way to make the chromebooks easier for the really young students. It would look like this: [link]. What do you think?"
Ask questions that get their thoughts flowing. Listen to the feedback. Make changes. Send them the new version. Repeat this feedback cycle until they are happy. This feedback cycle makes the teachers much happier with the results. It takes a few days or weeks, but its well worth it.
Just to give you an idea of how much the feedback matters, consider my first and final drafts. The first idea was to have three rows of icons and to color code them based on grade level. By the time we were done, we moved to a much different design that was less flashy but more effective. In part, this was because there were some sites that were used at several grade levels, so the color coding didn't work out. See what I mean in the images below.
First draft:


The point? Don't over-think things. Let the teachers be your guide. Its less work for you in the long run and it makes a result that they'll be happier with.
Public SessionsOnce you have your Google Site completed, we move back into the more technical aspects of the process.
You'll need a testing environment. Get a single chromebook that you can use for testing your settings. In admin.google.com, make a new OU and place only this chromebook into it. We'll make all of the changes inside this OU for now, so you can perfect your system.
Go to "Device management" and then "Public session settings". Select the OU that you just created. Name the session that you want the teachers to see. I used "Kiosk", but "Dashboard" or "Springpad" or "Quick Launch" are all fine. This is what some people call "branding." Its the word that you want people to use when they think of this service you're creating. You can come back and change this latter, so don't over-think it right now.

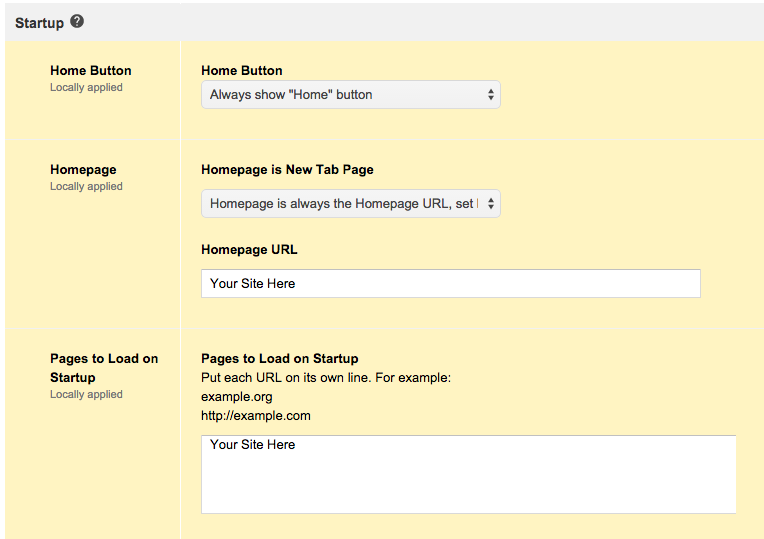
Next, scroll down to the "Startup" settings. For "Homepage is New Tab Page" set it to "Homepage is always the Homepage URL, set below". Then type in the URL to your Google Site. Enter the same URL under "Pages to Load on Startup" as well. Then save your settings.
Now go to "Device management" and then "Device settings". Select the OU for your testing environment again. Set "Public Session Kiosk" to "Allow Public Session Kiosk". Save your new settings.

Go to your testing chromebook. Restart it so the new settings kick in. There should now be a new login window. It should just say "Kiosk" (or whatever your public session is named). Click on that and then the next button. You should go straight to the Google Site you made.
If this worked, its time to polish the settings. Sorry, but I have to be vague here. The settings that work for me might not work for you. Things that I considered include "Auto-Launch Public Session" (in Device Settings) and various settings in the Public Session (such as idle logout, avatar, wallpaper, etc.) This is why you need a testing environment. Keep making changes and then looking at the results. See what works for you and what doesn't.
Next, and perhaps most importantly, get teacher feedback. Ask for a 15 minute after-school meeting with that team of teachers. Show your test system to the ones that show. Ask what they think. Point out things you can adjust, such as the Google Site's contents and layout, the avatar icon, the idle logout period, the session name, etc. Take notes of their suggestions. Ask the group for a consensus. Then let them know what changes you'll make and let them know about when you'll roll out the changes.
Make the changes that you agreed to and test them. If everything is working, you have everything you need. On the afternoon before the scheduled rollout, make new public sessions in the OUs that you want to effect. Just copy over all the settings. (Unfortunately, this has to be done manually.) Then enable the public session in the device settings and you're all set.
Great idea for the little ones.....My PreK principal needs some convincing that Chromebooks will work for his campus and this should help.....Thanks.
ReplyDelete